
If you have a soft spot for all things sweet, gooey, and utterly nostalgic, then you are going to adore this S’mores Bar Recipe. It’s everything you love about classic campfire s’mores, cleverly reimagined into an easy-to-make dessert bar that’s perfect for sharing (or not!). Imagine a buttery, crumbly graham cracker crust hugging melted Chocolate bars and toasted marshmallows on top, creating layers of crispy, melty, sugary goodness in every bite. Whether you’re entertaining friends or simply craving a comforting treat, this recipe will quickly become your go-to for an irresistible homemade dessert.
Ingredients You’ll Need
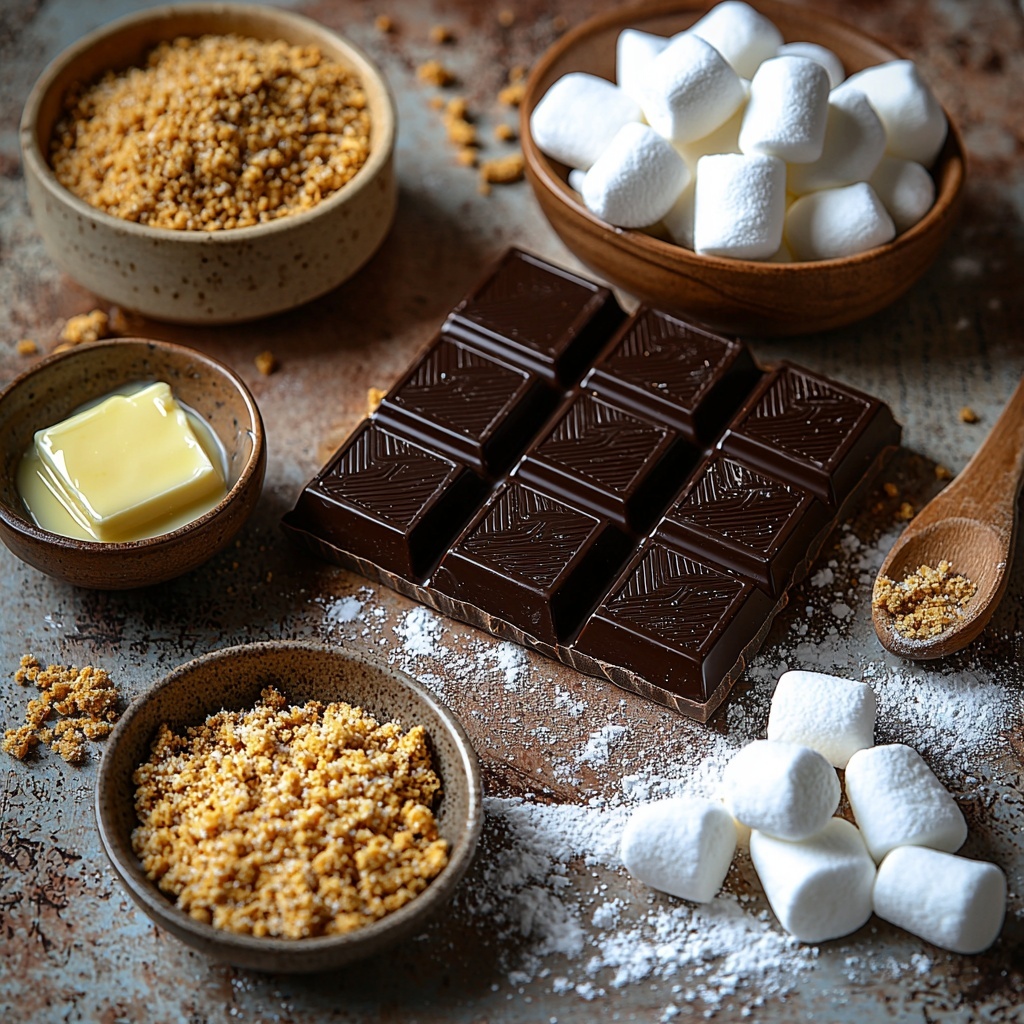
The beauty of the S’mores Bar Recipe is in its simplicity. Each ingredient is carefully chosen to build that perfect balance of crunchy, creamy, and fluffy textures while delivering rich, delicious flavors that everyone will adore.
- Graham cracker crumbs (2 cups): The base of your crust, giving that iconic crunchy and slightly sweet flavor reminiscent of traditional s’mores.
- Melted butter (8-12 tablespoons): This binds the crumb crust and adds a luscious, rich flavor; use more if you prefer a denser crust.
- Powdered sugar (1/2 cup): Adds subtle sweetness and helps the crust hold together like a charm.
-
Milk chocolate bars (4 bars, 4.4 ounces each): The melty, chocolatey middle layer that rewards every bite with that creamy milk chocolate taste you crave.
- Mini marshmallows (1 package): These create that signature toasted topping, giving your bars a gooey, golden finish that’s simply irresistible.
How to Make S’mores Bar Recipe
Step 1: Prepare Your Oven and Pan
First things first, preheat your oven to 350 degrees Fahrenheit and grab a 9×13 baking pan. Make sure to grease it well with non-stick butter spray so your s’mores bars don’t stick—a little prep here goes a long way for easy serving later.
Step 2: Mix the Crust
In a medium bowl, combine your graham cracker crumbs, powdered sugar, and melted butter. Stir everything together until the crumbs get evenly coated and start to hold together like a lovely crumbly dough. This simple mix will form the buttery, crispy foundation for the whole dessert.
Step 3: Press and Bake the Crust
Press this crumbly mixture firmly into the bottom and slightly up the sides of your greased pan. Don’t just sprinkle it in—packing it tightly with your fingers will help create that crisp, hold-together texture. Bake the crust for 5 to 8 minutes, just until the edges turn a gentle golden brown. Remember, it will harden even more as it cools, so take it out before it overbakes.
Step 4: Add the Chocolate Layer
Once your crust has cooled, lay the Milk chocolate bars side by side on top, trying to cover the entire crust with chocolate. This layer is what brings that smooth, creamy richness to your bars. Pop the pan back in the oven for about 3 minutes so the chocolate starts to melt and looks shiny—this helps the marshmallows stick perfectly in the next step.
Step 5: Top with Marshmallows and Broil
After cooling the melted chocolate for a minute or two, cover the entire bar with mini marshmallows placed closely together. Then, switch your oven to broil and carefully place the pan inside. Here’s the most thrilling and nerve-wracking part—watch those marshmallows closely as they broil for about 2 minutes until they puff up and turn a gorgeous golden brown. It only takes a blink to go from perfect to burnt, so keep a hawk’s eye on them!
Step 6: Cool and Serve
Remove the pan from the oven and let the bars cool completely. For extra neat slices, pop them in the fridge for a bit to firm up before cutting. Since the marshmallows are sticky, use a sharp knife warmed under hot water and dried before slicing. If the knife gets sticky, just warm and dry it again—you’ll thank me for this little trick!
How to Serve S’mores Bar Recipe
Garnishes
While these bars are perfect on their own, adding a sprinkle of finely chopped nuts like pecans or a drizzle of caramel sauce can elevate your serving experience. For a fun twist, dust a little cocoa powder or crushed graham crackers on top to make each bite look as good as it tastes.
Side Dishes
If you’re serving these at a gathering, pair your s’mores bars with a scoop of vanilla ice cream or a dollop of whipped cream for a decadent dessert plate. They also go wonderfully alongside fresh berries which cut through the sweetness with a bright pop of flavor.
Creative Ways to Present
Want to impress your guests? Serve these S’mores Bar Recipe squares on rustic wooden boards or in small mason jars layered with extra marshmallows and chocolate chips for a “dessert parfait” vibe. Wrapping individual pieces in parchment paper tied with twine makes for charming, edible party favors too.
Make Ahead and Storage
Storing Leftovers
These bars keep beautifully at room temperature if covered loosely with foil or in an airtight container for up to two days. To preserve their chewy, melty goodness longer, store them in the refrigerator where they can last up to a week, though they may firm up slightly.
Freezing
You can freeze s’mores bars by wrapping them tightly in plastic wrap and then placing them in a sealed freezer bag. They’ll stay fresh for up to three months. Thaw them in the fridge before serving—this makes a fantastic make-ahead treat for last-minute cravings!
Reheating
To bring a bit of that just-baked warmth back to your bars, microwave individual slices for 15-20 seconds or warm them in the oven at 300 degrees Fahrenheit for about 5 minutes. This refreshes the gooey texture without overcooking the marshmallows.
FAQs
Can I use a different type of chocolate?
Absolutely! While Hershey’s milk chocolate bars give that classic s’mores flavor, feel free to experiment with dark chocolate, semi-sweet, or even flavored chocolate bars to suit your taste. Just make sure the chocolate melts nicely for the best texture.
Are there alternatives to graham cracker crumbs?
If you don’t have graham crackers on hand, crushed digestive biscuits or even golden Oreos can work wonderfully to create a similar crispy crust with a little twist.
Can I make this recipe gluten-free?
Definitely! Just swap the graham cracker crumbs for a certified gluten-free version, and ensure that your chocolate and marshmallows don’t contain gluten ingredients. The rest of the recipe stays the same!
What’s the best way to get perfectly toasted marshmallows?
The trick is watching closely under the broiler and removing as soon as they’re golden brown. Ovens vary, so don’t walk away at this stage—marshmallows can go from deliciously toasted to burnt in seconds.
Can I add other toppings to the bars?
Yes! Chopped nuts, peanut butter drizzle, crushed candy, or even sprinkles can add a fun texture and make these bars uniquely yours. Just add them before broiling the marshmallows for the best effect.
Final Thoughts
There’s something deeply comforting about this S’mores Bar Recipe that makes it a timeless favorite for any occasion. It’s simple to prepare, endlessly customizable, and delivers big smiles with every bite. Whether you’re a longtime s’mores fan or just discovering the magic of this campfire classic, these bars are a warm hug of sweetness waiting to happen. So grab your ingredients, turn on that oven, and get ready to treat yourself and your loved ones to a dessert you’ll be asked to make again and again!
Print
S’mores Bar Recipe
- Prep Time: 10 minutes
- Cook Time: 10–12 minutes
- Total Time: 20–22 minutes
- Yield: 16 servings
- Category: Dessert
- Method: Baking
- Cuisine: American
Description
This S’mores Bar recipe brings the classic campfire treat into an easy-to-make dessert bar form. Featuring a crispy graham cracker crust, melted Hershey’s chocolate, and toasted mini marshmallows, it’s baked and broiled to perfection in under 30 minutes, making it perfect for parties or a quick indulgent snack.
Ingredients
Crust
- 2 cups graham cracker crumbs
- 8–12 tablespoons melted butter
- 1/2 cup powdered sugar
Filling
- 4 Milk chocolate bars (4.4 ounces each)
- 1 package mini marshmallows
Instructions
- Preheat Oven: Preheat your oven to 350°F (175°C) to prepare for baking the crust.
- Prepare Pan: Grease a 9×13-inch baking pan lightly with non-stick butter spray to prevent sticking.
- Mix Crust Ingredients: In a medium bowl, combine the graham cracker crumbs, powdered sugar, and melted butter. Stir well until all the crumbs are evenly coated and the mixture holds together when pressed.
- Form Crust: Press the crumb mixture firmly and evenly along the bottom and up the sides of the prepared pan using your fingers to pack it tightly.
- Bake Crust: Bake the crust for 5-8 minutes until the edges start turning golden brown. The crust will firm up as it cools.
- Cool Crust: Remove the pan from the oven and allow the crust to cool slightly before adding the next layers.
- Layer Chocolate: Lay the Milk chocolate bars over the graham crust, covering it as completely as possible.
- Melt Chocolate: Return the pan to the oven and bake for about 3 minutes until the chocolate begins to melt and looks shiny.
- Cool Slightly: Let the pan cool for 1-2 minutes to set the melted chocolate slightly.
- Add Marshmallows: Place mini marshmallows closely packed on top of the melted chocolate layer, covering the surface well.
- Broil Marshmallows: Turn the oven setting to broil and place the pan in the oven. Watch carefully and broil for about 2 minutes until the marshmallows are golden brown and toasted. Remove immediately to prevent burning.
- Cool Completely: Allow the bars to cool completely. For easier cutting, refrigerate them until set.
- Serve: Use a warm, sharp knife (warm under hot water, dry, then slice) to cut through the sticky bars. Serve and enjoy!
Notes
- The crust hardens as it cools, so don’t worry if it feels soft right out of the oven.
- Use caution while broiling marshmallows as they can burn or catch fire quickly; stay close during this step.
- Warming and drying the knife between cuts helps prevent the sticky marshmallow and chocolate from sticking to the blade.
- Refrigerating the bars after cooling makes cutting cleaner and easier.
- Butter quantity can be adjusted between 8 to 12 tablespoons depending on the desired crust firmness and richness.

