
If you’ve been on the hunt for a fun, festive, and utterly delicious cookie to add to your baking repertoire, the Red Velvet Blossom Cookies Recipe is going to steal your heart. These vibrant red treats bring together the rich flavor of red velvet cake with the cozy, familiar pinch of a chocolate kiss perched right in the center. Soft, slightly chewy, and sprinkled with a delicate sugar coating, these cookies are perfect for any occasion where you want to impress with minimal fuss and maximum charm. Get ready for a delightful baking adventure that’s as joyful as it is scrumptious!
Ingredients You’ll Need
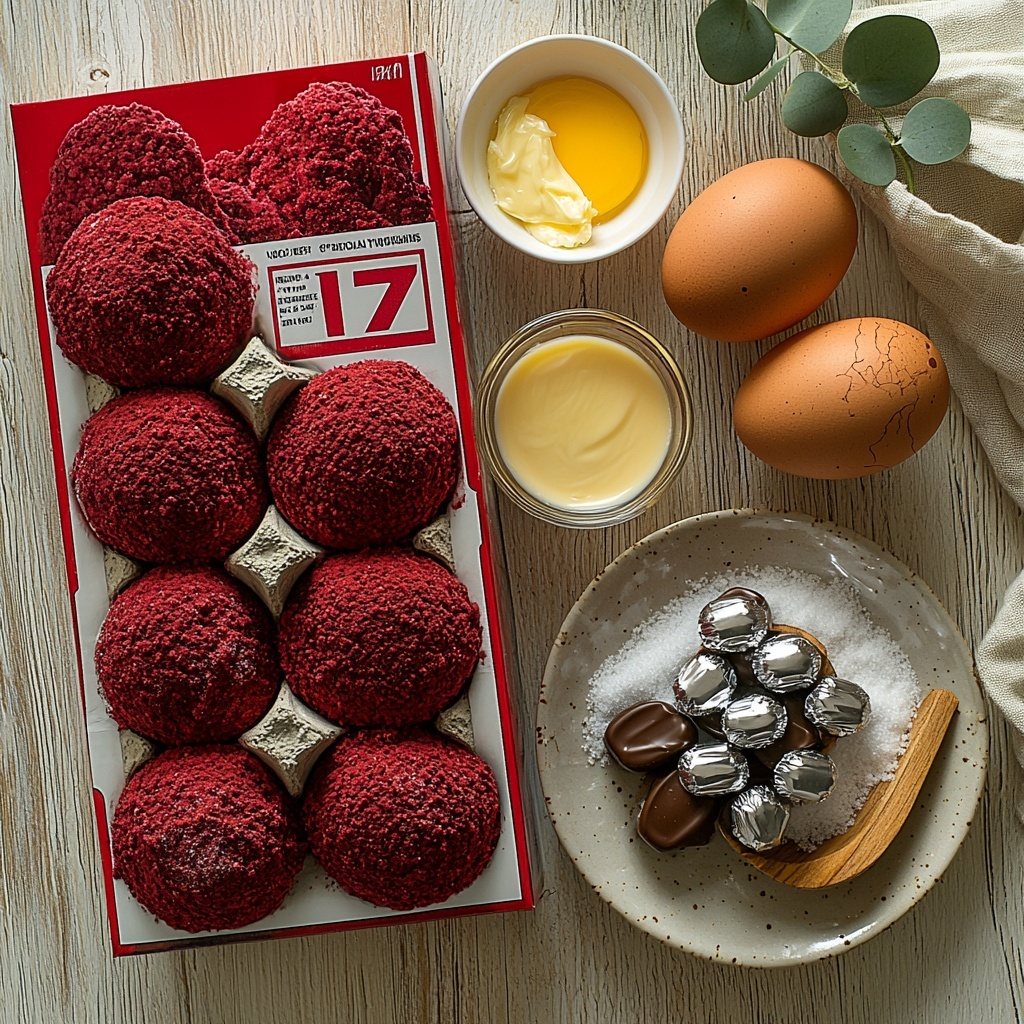
Gathering your ingredients for this recipe is a breeze, and each one plays a vital role in building the flavor, texture, and iconic look of these cookies. From the moist cake mix base to the finishing touch of chocolate kisses, every element adds its own magic.
- Red velvet cake mix (15.25 oz): This is the foundation of your cookies, infusing them with that classic red velvet flavor and tender crumb.
- Large eggs (2): Eggs bind everything together, adding structure and moisture to your dough.
- Unsalted butter (½ cup, melted): Butter adds richness and helps the cookies crisp just a bit on the edges.
- Vanilla extract (1 tsp): A splash of vanilla enhances the cake mix’s flavor and rounds out the sweetness.
- Espresso powder (½ tsp, optional): A subtle depth boost that complements the chocolate and red velvet without overpowering.
- Regular or coarse sugar (1 cup): Rolling the dough in sugar before baking gives the cookies a lovely sparkling crust.
- Hershey’s kiss candies (24): These iconic chocolates become the heart of each cookie, adding a melty, rich center.
How to Make Red Velvet Blossom Cookies Recipe
Step 1: Mix Your Wet Ingredients
Start by whisking together the eggs, melted butter, and vanilla extract. This combination creates a smooth, rich base that will marry wonderfully with the red velvet cake mix, ensuring every bite is moist and flavorful.
Step 2: Incorporate Dry Ingredients
Add your red velvet cake mix and the optional espresso powder to the wet mixture. Stir everything until the dough is fully combined and has a thick, slightly sticky consistency. This step is where your cookies start taking shape in the bowl, ready to shine in the oven.
Step 3: Chill the Dough
Pop the dough in the fridge for about 30 minutes. Chilling firms up the dough, making it easier to roll into uniform balls—plus, it helps your cookies bake up with a perfect texture and less spreading.
Step 4: Shape and Sugar Coat
Once chilled, roll the dough into 1½-inch balls and coat each one thoroughly in sugar. This coating is not just for looks; it adds a delightful crunch and a sparkling finish that contrasts beautifully with the soft cookie interior.
Step 5: Bake to Perfection
Bake your sugar-coated balls at 350°F for 8 to 10 minutes. You’ll know they’re ready when the edges begin to set, the cookies puff up, and the tops start to crackle gently. Be careful not to overbake to keep them wonderfully tender.
Step 6: Add the Chocolate Kiss
While the cookies are still warm, gently press a Hershey’s kiss candy into the center of each one. This creates that iconic blossom look and lets the chocolate soften just slightly for a luscious finish. If you’re using a Hugs candy kiss, chilling the cookies after baking helps prevent the chocolate from melting too much.
How to Serve Red Velvet Blossom Cookies Recipe
Garnishes
To make these cookies really pop, sprinkle a tiny pinch of sea salt over the chocolate kisses once they are set. The salt perfectly balances the sweetness and heightens the chocolate flavor, creating a mouthwatering contrast that everyone will love.
Side Dishes
Red Velvet Blossom Cookies pair beautifully with a tall glass of cold milk or a frothy cup of coffee. For something a bit more festive, serve alongside a creamy hot chocolate or even a scoop of vanilla ice cream for an indulgent dessert duo.
Creative Ways to Present
These cookies are festive enough to serve as-is, but you can also get creative by arranging them on a cake stand with fresh berries and mint leaves for a party-ready dessert spread. Packaging them in a cute gift box makes a thoughtful and delicious homemade gift that friends and family will treasure.
Make Ahead and Storage
Storing Leftovers
Once your Red Velvet Blossom Cookies have completely cooled, store them in an airtight container at room temperature. They’ll stay fresh and soft for up to five days, making them perfect for prepping ahead for a party or weeknight treat.
Freezing
If you want to keep these cookies longer, freeze the baked and cooled cookies in a single layer on a baking sheet first, then transfer them to a freezer-safe container or bag. They freeze beautifully for up to three months and thaw quickly at room temperature.
Reheating
To bring a little warmth and softness back to chilled or frozen cookies, pop them in the microwave for 10-15 seconds or warm them in an oven at 300°F for 5 minutes. This quick step revives their fresh-baked charm with melty chocolate centers.
FAQs
Can I use a different cake mix flavor instead of red velvet?
Absolutely! While the red velvet cake mix gives these cookies their signature flavor and color, you can experiment with chocolate, vanilla, or even spice cake mixes for new twists. Just keep in mind that the flavor and texture will change accordingly.
What if I don’t have espresso powder? Can I skip it?
Yes, the espresso powder is completely optional. It adds a subtle depth to enhance the chocolate flavor, but leaving it out won’t drastically affect the overall deliciousness of your cookies.
How do I prevent the chocolate kisses from melting too much?
Press the kisses into the cookies right after baking while they’re still warm, then allow the cookies to cool completely before moving them. For Hugs kisses, chilling the cookies in the fridge or freezer helps set the chocolate quickly.
Can I make these cookies gluten-free?
Since the recipe relies on a boxed cake mix, to make a gluten-free version, choose a certified gluten-free red velvet cake mix. Just be sure to check all ingredient labels carefully for hidden gluten sources.
Why do the cookies get sugar-coated before baking?
Rolling the cookie balls in sugar before baking creates a delicate, sweet crust that provides a lovely textural contrast to the soft, chewy inside. Plus, it gives the cookies a festive shimmer that makes them look irresistible.
Final Thoughts
Making the Red Velvet Blossom Cookies Recipe is like inviting a little joy and nostalgia into your kitchen. They’re straightforward to make but have that wow-factor that’ll have everyone asking for seconds. Whether for the holidays, a special get-together, or just a treat-yourself moment, these cookies are an absolute delight you’ll want to bake again and again. So grab your ingredients and get ready to create something wonderfully sweet and memorable!
Print
Red Velvet Blossom Cookies Recipe
- Prep Time: 10 minutes
- Cook Time: 10 minutes
- Total Time: 50 minutes
- Yield: 24 servings
- Category: Dessert
- Method: Baking
- Cuisine: American
- Diet: Vegetarian
Description
Delight in these festive Red Velvet Blossom Cookies, featuring a soft, moist red velvet dough rolled in sugar and topped with a melty chocolate kiss. Perfect for holiday gatherings or a sweet treat any time of year, these cookies combine classic red velvet flavors with a fun and easy twist that the whole family will love.
Ingredients
Cookie Dough
- 1 box red velvet cake mix (15.25 oz.)
- 2 large eggs
- ½ cup unsalted butter, melted
- 1 tsp vanilla extract
- ½ tsp espresso powder (optional)
For Rolling and Topping
- 1 cup regular or coarse sugar
- 24 Hershey’s Kiss candies (or other mini chocolate candies)
Instructions
- Mix Wet Ingredients: In a large mixing bowl, whisk together the eggs, melted butter, and vanilla extract until fully combined and smooth.
- Add Dry Ingredients: Gradually add the red velvet cake mix and espresso powder (if using) to the wet mixture. Stir until the dough is fully incorporated and uniform in color.
- Chill Dough: Cover the dough and chill in the refrigerator for about 30 minutes. This step firms up the dough, making it easier to handle and roll into balls.
- Form and Sugar Coat Balls: Once chilled, roll the dough into 1½-inch balls. Roll each ball generously in the sugar until fully coated, which adds a delightful crunch and sparkle to the finished cookies.
- Bake Cookies: Preheat your oven to 350°F (175°C). Place the sugar-coated dough balls onto a lined or greased baking sheet, spacing them evenly. Bake for 8-10 minutes, or until the edges start to set, and the cookies are puffed and just beginning to show slight cracks on the surface.
- Add Chocolate Kisses: Immediately upon removing the cookies from the oven, gently press one Hershey’s Kiss into the center of each cookie. The warm cookies will soften the candy slightly, helping it adhere and melt into the dough.
- Cool Completely: Allow the cookies to cool completely on the baking sheet before moving. If using Hugs candy kisses, note that they tend to melt more and lose shape. To preserve their form, chill the cookies in the refrigerator or freezer until the chocolate sets completely.
Notes
- Espresso powder is optional but enhances the chocolate flavor if included.
- Use coarse sugar for a crunchier coating and shiny finish.
- For variation, try different mini chocolate candies as a topping.
- Refrigerating dough is crucial for easier handling and better texture.
- Cookies should be stored in an airtight container and can be refrigerated to keep the chocolate kisses firm.


