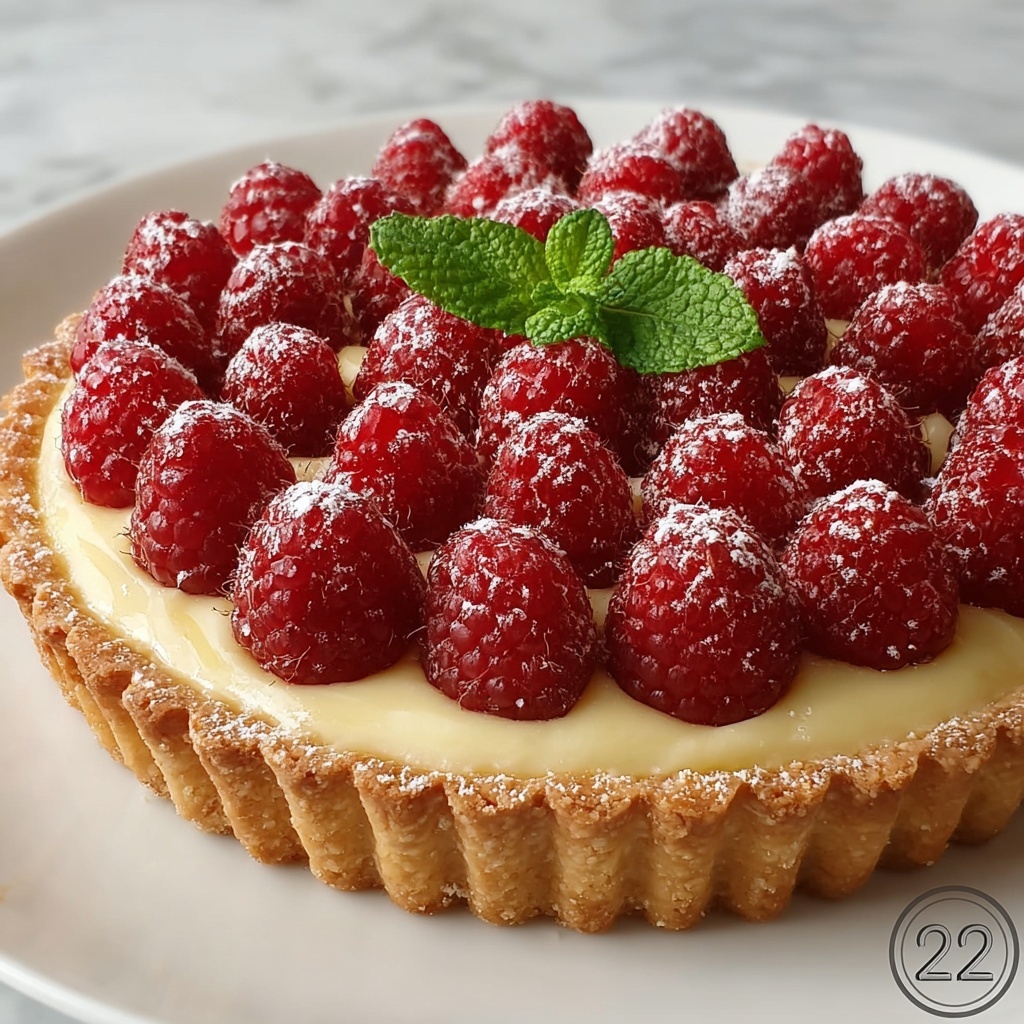
If you’re looking for a dessert that feels both indulgent and fresh, this Raspberry White Chocolate Tart Recipe is an absolute showstopper. Imagine a buttery, crisp tart crust perfectly cradling a silky, luscious white chocolate filling, all topped with vibrant, sweet-tart fresh raspberries that practically sing with every bite. It’s the kind of dessert that brightens any occasion, effortlessly combining creamy richness with fruity brightness. Whenever I make this tart, it becomes the star of the table, a treat that feels as special as it tastes.
Ingredients You’ll Need
Gathering these simple, high-quality ingredients is the key to nailing this tart’s balance of flavors and textures. Each element plays a crucial role, from the flaky crust to the velvety filling and the jewel-like raspberry topping.
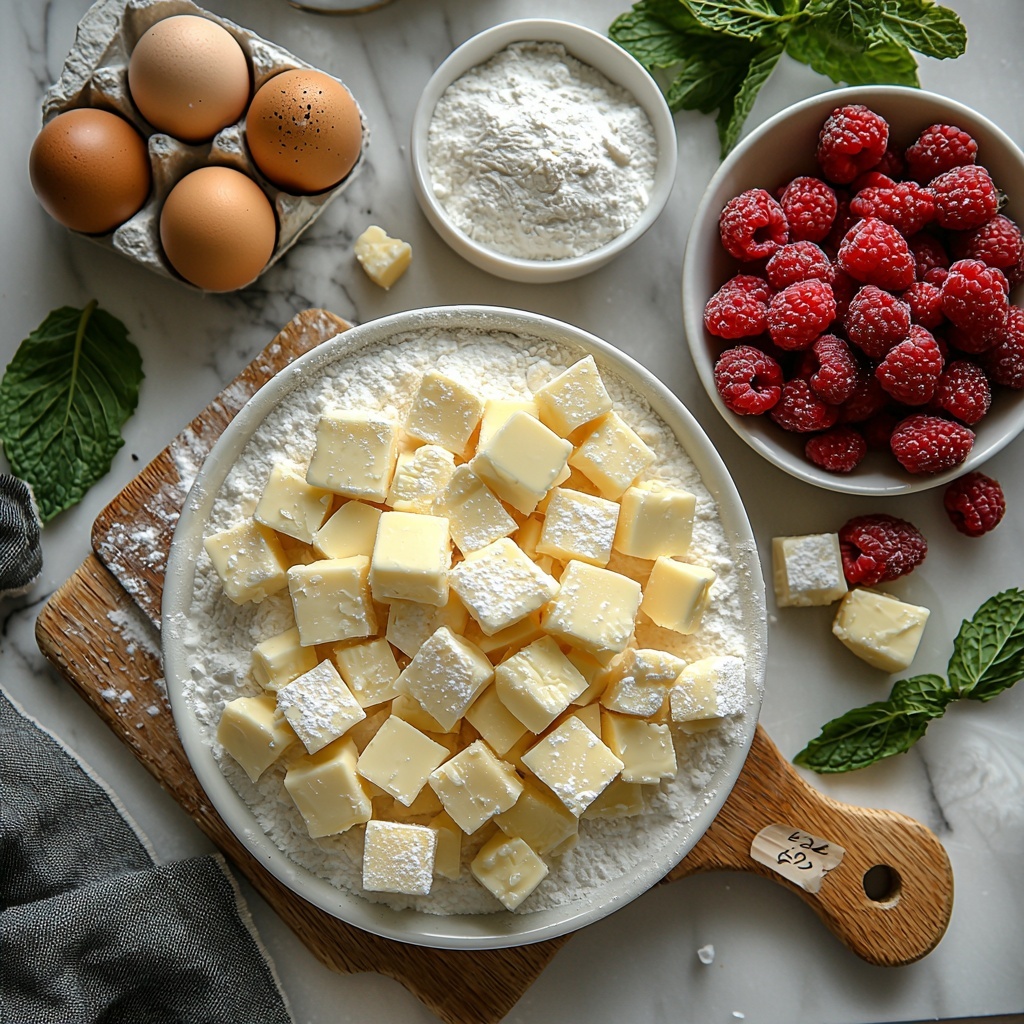
- 1 1/2 cups all-purpose flour: The base for your tart crust, providing structure and that flaky bite.
- 1/4 cup powdered sugar: Adds a touch of sweetness and tenderness to the crust.
- 1/2 cup unsalted butter (cold and cubed): This is what makes the crust rich and flaky.
- 1/4 teaspoon salt: Enhances all the flavors subtly throughout the tart.
- 1 large egg yolk: Binds the dough together while adding richness.
- 2-3 tablespoons ice water: Helps bring the dough together without melting the butter.
- 8 oz white chocolate (chopped): The star of the filling, bringing that creamy sweetness.
- 1 cup heavy cream: Creates the luscious texture of the filling.
- 2 large eggs: Adds body and firmness to the chocolate custard.
- 1 teaspoon vanilla extract: Infuses warmth and depth into the filling.
- 1/4 teaspoon salt: Balances the sweetness in the filling.
- 2 cups fresh raspberries: The fresh, fruity topping that adds vibrancy and a bit of zing.
- 2 tablespoons granulated sugar: Used to macerate raspberries, amplifying their natural juiciness.
- Mint leaves (optional): Adds a pop of green and a refreshing note for garnish.
How to Make Raspberry White Chocolate Tart Recipe
Step 1: Prepare the Tart Crust
Start by mixing the flour, powdered sugar, and salt in a medium bowl until well combined. Next, add the cold, cubed butter and work it into the flour with your fingers or a pastry cutter until you get coarse crumbs. This step is crucial for creating that perfect flaky texture you want from a tart crust.
Step 2: Bring the Dough Together
Whisk together the egg yolk and cold water, then add it gradually to your crumbly mixture. Stir gently until the dough just begins to hold together. Handle it as little as possible to keep the butter from melting and preserve the texture.
Step 3: Chill the Dough
Shape the dough into a disk, wrap it up tight in plastic wrap, and let it rest in the fridge for at least 30 minutes. This chilling phase relaxes the gluten and firms up the butter, which is essential for a tender tart crust.
Step 4: Roll and Bake the Crust
Preheat your oven to 350°F (175°C). Roll out your chilled dough on a lightly floured surface to fit a 9-inch tart pan. Press it in gently, trim the excess, then prick the base with a fork to prevent bubbling. Lining the crust with parchment and pie weights will keep it from shrinking. Bake it for an initial 15 minutes, then remove the weights and give it another 5-10 minutes until golden and fragrant. Cool completely before filling.
Step 5: Make the White Chocolate Filling
The filling is where the magic happens. Melt your chopped white chocolate and heavy cream together over a gentle heat using a double boiler, stirring until perfectly smooth. In a separate bowl, whisk eggs, vanilla, and salt, then slowly add your warm chocolate mixture, whisking constantly to keep it silky. Pour this luscious custard into your cooled tart crust and smooth the top.
Step 6: Bake the Tart
Bake the filled tart in the oven for about 20-25 minutes, just until the filling is mostly set but still has a slight jiggle in the center. This texture will finish setting as it cools, giving you a luxuriously creamy bite.
Step 7: Cool and Chill
Once baked, let the tart come to room temperature, then refrigerate it for at least two hours to fully set. This step helps the filling firm up into that perfect creamy consistency.
Step 8: Prepare and Add the Raspberry Topping
Toss the fresh raspberries with the granulated sugar and let them rest for about 15 to 20 minutes. This simple maceration process brings out their juices and intensifies their sweetness, creating a juicy, vibrant topping that pairs beautifully with the white chocolate filling. Arrange these ruby gems on top of the chilled tart with care.
Step 9: Garnish and Serve
For a final flourish, add some fresh mint leaves to bring a burst of color and a refreshing note. Then slice and serve your stunning Raspberry White Chocolate Tart Recipe chilled to enjoy every contrasting texture and taste.
How to Serve Raspberry White Chocolate Tart Recipe
Garnishes
Fresh mint leaves are a classic choice, adding a lively green hue that balances the deep pink raspberries and creamy filling. If you want to get creative, a light dusting of powdered sugar over the top adds a touch of elegance and sweetness. For an extra flavor dimension, a drizzle of raspberry coulis alongside each slice can elevate the presentation and taste.
Side Dishes
This tart pairs beautifully with a simple dollop of lightly whipped cream or a scoop of vanilla bean ice cream to enhance its creamy texture. For a brunch or afternoon tea setting, serve alongside a fresh berry salad or a crisp green salad dressed in citrus vinaigrette to complement the tart’s sweetness and keep things light.
Creative Ways to Present
If you want to wow your guests, consider individual tartlets made with the same recipe for personalized servings. Alternatively, layer the raspberries inside the filling for a surprise burst of flavor in every bite. You can also alternate raspberries with other berries like blueberries or sliced strawberries to add color variety and flavor complexity.
Make Ahead and Storage
Storing Leftovers
This tart keeps beautifully in the refrigerator for up to three days. Cover it tightly with plastic wrap or store in an airtight container to maintain freshness and avoid it picking up any fridge odors. The raspberries might soften slightly over time, so it’s best enjoyed sooner rather than later.
Freezing
While the tart crust and white chocolate filling freeze well individually, the fresh raspberries do not hold up well to freezing and thawing. If you want to freeze, wrap the tart (without raspberries) tightly in plastic wrap and aluminum foil, and freeze for up to one month. Thaw overnight in the fridge before topping with fresh raspberries and serving.
Reheating
This tart is best enjoyed chilled, so reheating is generally not recommended. However, if you prefer it slightly warmer, let it sit at room temperature for 30 minutes before serving to soften the filling slightly without losing texture or flavor.
FAQs
Can I use frozen raspberries for the Raspberry White Chocolate Tart Recipe?
Fresh raspberries are best for this tart as they provide that vibrant color and firm texture. Frozen raspberries tend to be mushy when thawed, which can make the tart soggy. If you only have frozen, be sure to drain any excess juice and add them just before serving to avoid sogginess.
Is there a substitute for white chocolate in this recipe?
You could experiment with milk chocolate or dark chocolate for a different flavor profile, but keep in mind this will change the character of the tart significantly. White chocolate provides a creamy, sweet base that balances perfectly with the tart raspberries.
How long does it take to make this Raspberry White Chocolate Tart Recipe?
The prep takes about 30 minutes, with an additional 20 minutes for baking the crust and around 20-25 minutes for the filling. Then, chilling time requires at least 2 hours, so plan ahead for the best results.
Can I make the crust ahead of time?
Absolutely! You can prepare and bake the crust a day or two in advance, storing it wrapped tightly in an airtight container at room temperature. This makes assembling the tart on the day of serving much quicker and easier.
What if I don’t have pie weights for blind baking?
No worries! Dried beans, rice, or even sugar can be used as a weight to prevent the crust from bubbling and shrinking during blind baking. Just be sure to keep the parchment between the crust and weights for easy removal.
Final Thoughts
This Raspberry White Chocolate Tart Recipe is truly one of those desserts that feels like a hug on a plate—rich yet fresh, elegant yet approachable. Whether you’re making it for a special occasion or a weekend treat, it’s sure to delight your taste buds and impress your guests. Give yourself the joy of creating and savoring this beautiful combination. You’re going to love every luscious bite!
Print
Delicious Recipe
- Prep Time: 30 minutes
- Cook Time: 20 minutes
- Total Time: 2 hours 50 minutes
- Yield: 8 servings
- Category: Dessert
- Method: Baking
- Cuisine: French
- Diet: Vegetarian
Description
This Raspberry White Chocolate Tart is a delightful dessert featuring a buttery, flaky tart crust filled with luscious white chocolate cream and topped with sweet, macerated fresh raspberries. Perfectly balanced with a smooth and creamy filling and vibrant fruit topping, this tart offers an elegant treat that’s ideal for special occasions or a refreshing everyday indulgence.
Ingredients
Tart Crust
- 1 1/2 cups all-purpose flour
- 1/4 cup powdered sugar
- 1/2 cup unsalted butter (cold and cubed)
- 1/4 teaspoon salt
- 1 large egg yolk
- 2–3 tablespoons ice water
White Chocolate Filling
- 8 oz white chocolate (chopped)
- 1 cup heavy cream
- 2 large eggs
- 1 teaspoon vanilla extract
- 1/4 teaspoon salt
Raspberry Topping
- 2 cups fresh raspberries
- 2 tablespoons granulated sugar (for macerating)
- Mint leaves (for garnish, optional)
Instructions
- Mix Dry Ingredients for Crust: In a medium bowl, combine 1 1/2 cups all-purpose flour, 1/4 cup powdered sugar, and 1/4 teaspoon salt. Mix thoroughly to integrate all dry ingredients.
- Cut in Butter: Add 1/2 cup cold, cubed unsalted butter to the flour mixture. Use a pastry cutter or your fingers to work the butter into the flour until the mixture resembles coarse crumbs, ensuring a flaky texture.
- Add Egg Mixture: In a small bowl, whisk together 1 large egg yolk and 2-3 tablespoons ice water. Gradually add this to the flour mixture, stirring until a dough forms.
- Chill Dough: Shape the dough into a disk, wrap in plastic wrap, and refrigerate for at least 30 minutes to allow it to firm up for easier rolling.
- Prepare the Tart Shell: Preheat oven to 350°F (175°C). Roll out chilled dough on a lightly floured surface to fit a 9-inch tart pan. Press dough into the pan and trim excess dough.
- Dock and Blind Bake: Prick the crust bottom with a fork to prevent air bubbles. Line with parchment paper and fill with pie weights or dried beans for blind baking.
- Bake Crust: Bake in preheated oven for 15 minutes. Remove parchment and weights; bake additional 5-10 minutes until crust is lightly golden. Cool completely.
- Melt Chocolate: Combine chopped white chocolate and heavy cream in a heatproof bowl set over simmering water (double boiler). Stir until chocolate melts and mixture is smooth.
- Combine Filling Ingredients: In a separate bowl, whisk 2 large eggs, vanilla extract, and salt. Slowly whisk warm chocolate mixture into eggs to avoid curdling.
- Fill Tart Shell: Pour the white chocolate filling into cooled tart crust, smoothing the top evenly.
- Bake Tart: Bake tart for 20-25 minutes until the filling is set but slightly jiggly in the center.
- Cool and Chill: Remove tart from oven, cool to room temperature, then refrigerate at least 2 hours to fully set the filling.
- Macerate Raspberries: Toss fresh raspberries with granulated sugar and let sit 15-20 minutes to release natural juices and sweetness.
- Decorate Tart: Arrange the macerated raspberries on the set tart surface.
- Garnish: Optionally, add fresh mint leaves on top for a vibrant finishing touch.
- Serve: Slice and serve the tart chilled for a refreshing and elegant dessert.
Notes
- Use cold butter and ice water to ensure the crust stays flaky and tender.
- Blind baking the crust prevents sogginess when adding the wet filling.
- Whisk warm chocolate into eggs gradually to prevent scrambling the eggs.
- Allow the tart to chill completely to achieve the perfect creamy texture.
- Fresh raspberries can be substituted with other berries like strawberries or blackberries depending on availability and preference.
- The tart is best served chilled and can be stored in the refrigerator for up to 2 days.

