“`html
If you’re on the lookout for a snack that’s both satisfying and packed with wholesome goodness, this Peanut Butter Protein Bars Recipe is about to become your new best friend. These bars bring together creamy peanut butter, hearty oats, and protein powder for a delicious, guilt-free treat that fuels your body and comforts your soul. Whether you need a quick post-workout boost or a midday pick-me-up, these bars deliver that perfect balance of sweet, nutty, and chocolaty flavors in every bite.
Ingredients You’ll Need
This Peanut Butter Protein Bars Recipe uses simple, pantry-friendly ingredients that come together beautifully to create a bar that’s chewy, rich, and energizing. Each ingredient plays a crucial role—adding that perfect taste, texture, and nutritional punch.
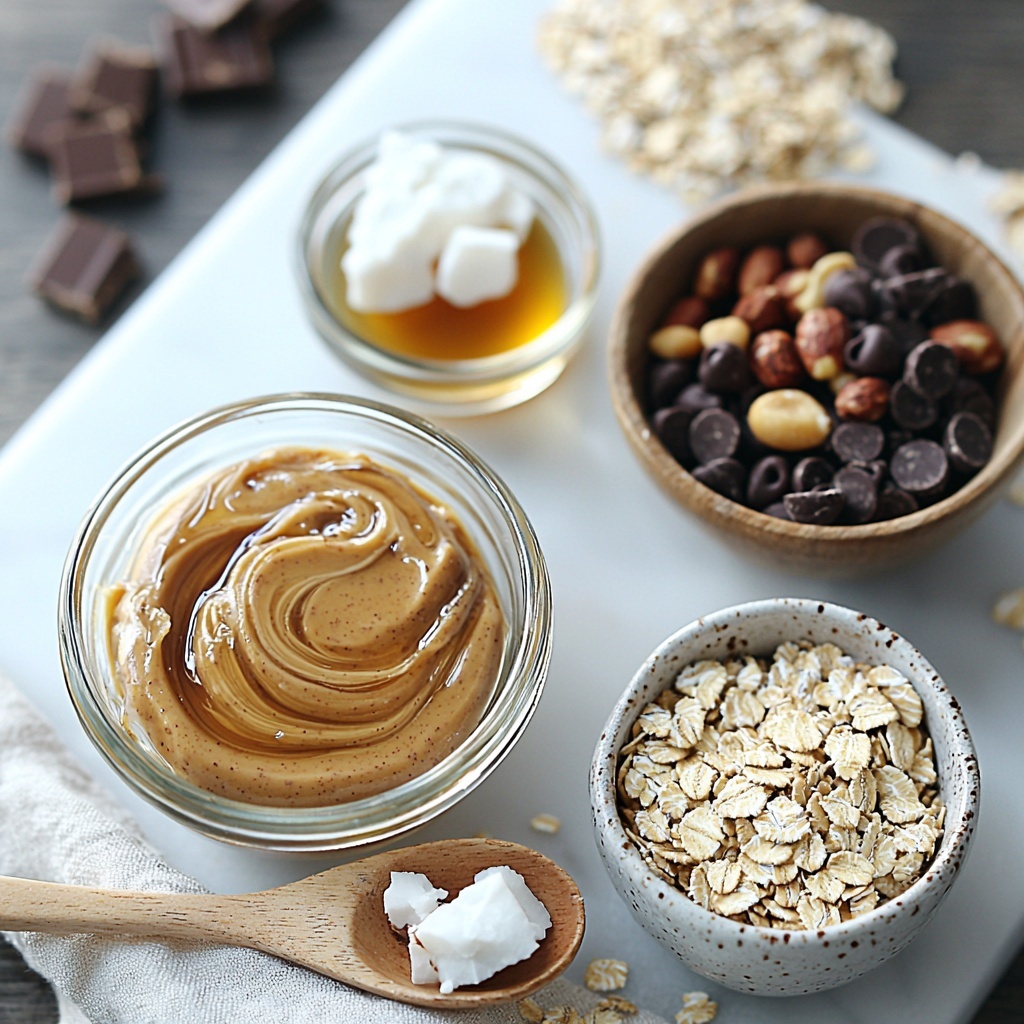
- 1 cup peanut butter (creamy or crunchy): Acts as the creamy, nutty base binding all the ingredients together with richness and flavor.
- ¼ cup maple syrup or honey: Provides natural sweetness and helps with the chewy texture, plus a hint of caramel undertones.
- 2 tbsp coconut oil: Adds smoothness, aids in setting the bars, and gives a subtle tropical aroma.
- 1 ½ cups rolled oats: For hearty texture and sustained energy that keeps you full longer.
- ½ cup protein powder (vanilla or unflavored): Boosts the protein content to keep these bars as much a power snack as a tasty treat.
- ¼ cup dark chocolate chips (optional): Adds bursts of bittersweet chocolate for indulgence without overdoing it.
- ¼ cup chopped nuts or seeds (optional): Introduces crunch and extra nutrients, customizing your bars to your liking.
How to Make Peanut Butter Protein Bars Recipe
Step 1: Prepare the Pan
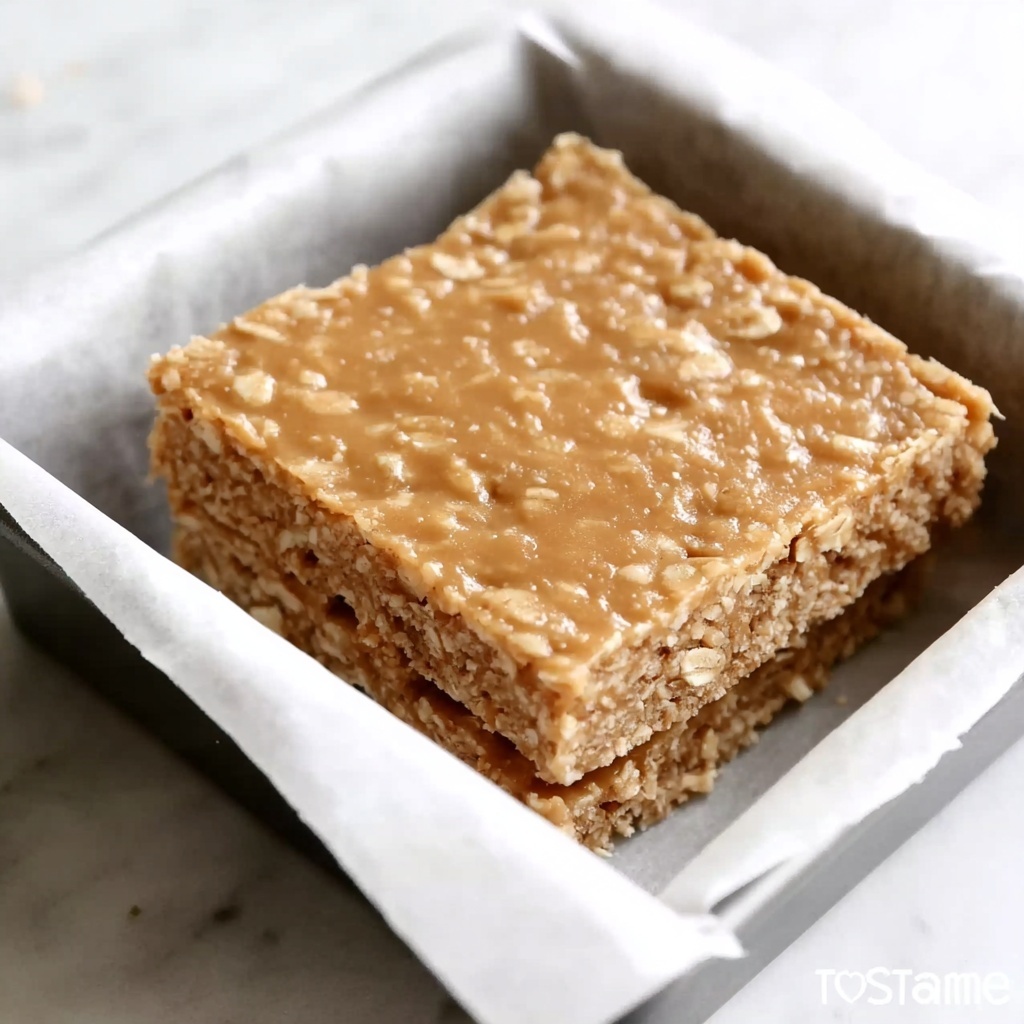
Start by lining an 8×8-inch pan with parchment paper, making sure to leave some extra overhang on the sides. This little trick will make it super easy to lift your bars out when they’ve set, ensuring clean, perfect slices every time without sticking.
Step 2: Melt Wet Ingredients
In a small saucepan over low heat, gently combine the peanut butter, maple syrup (or honey), and coconut oil. Stir constantly until everything melts into a smooth, luscious mixture. Once smooth, remove from the heat so it doesn’t burn or separate—this silky blend is what makes the bars so delightfully chewy and flavorful.
Step 3: Mix Dry Ingredients
Next, add the rolled oats and protein powder to the warm peanut butter mixture. Stir well until everything is evenly coated and combined. If you’re feeling a bit fancy, now is the time to fold in the chocolate chips and chopped nuts or seeds for added texture and bursts of flavor.
Step 4: Press and Chill
Transfer the sticky mixture into your prepared pan, pressing it down firmly and evenly with a spatula or your hands (wetting them slightly helps). This step ensures your bars hold together well and have a uniform thickness. Pop the pan into the refrigerator and chill for 1 to 2 hours until the bars are firm and set.
Step 5: Slice and Store
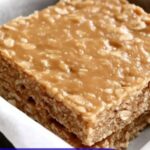
Once the bars have set completely, use the parchment overhang to lift them from the pan. Place on a cutting board and slice into 10-12 equally sized bars. These bars store beautifully in the fridge for up to 1 week, and they’re perfect for meal prep or on-the-go snacking.
How to Serve Peanut Butter Protein Bars Recipe
Garnishes
While these bars are delicious just as they are, a quick dusting of cocoa powder or a drizzle of melted dark chocolate on top before chilling can elevate the presentation and add a little extra indulgence. A sprinkle of flaky sea salt can also accentuate the peanut butter’s natural flavor!
Side Dishes
Pair your Peanut Butter Protein Bars Recipe with a fresh fruit salad or a creamy Greek yogurt for a balanced snack that hits every craving. A refreshing smoothie or a cup of your favorite herbal tea also complements the bars’ richness perfectly.
Creative Ways to Present
Want to impress friends or pack these bars for a gift? Wrap each bar individually in parchment paper tied with twine, or layer them in a decorative tin with wax paper in between. You can also cut the bars into bite-sized squares and serve them on a colorful platter alongside nuts and dried fruit for a fun snack board experience.
Make Ahead and Storage
Storing Leftovers
If you find yourself with leftovers (lucky you!), store the bars in an airtight container in the fridge. They will stay fresh and chewy for up to 1 week, making it easy to grab a healthy, delicious bite whenever hunger strikes.
Freezing
These bars freeze exceptionally well, lasting up to 3 months in the freezer. Wrap them individually or place them in a freezer-safe container with parchment paper between layers. When you’re ready, thaw your chosen bar in the fridge overnight or at room temperature for about 15 minutes for a quick snack.
Reheating
While these bars are best enjoyed chilled or at room temperature, a quick 10-15 second zap in the microwave can soften them just enough if you prefer them a bit warm. Just be careful not to overheat, or the bars might become too melty.
FAQs
Can I use natural peanut butter instead of creamy or crunchy?
Yes! Just keep in mind that natural peanut butter can be a bit runnier and may change the texture of your bars slightly. You might want to chill the mixture a bit longer to help it set firmly.
Is it necessary to add protein powder?
The protein powder boosts the nutritional value, but if you don’t have any on hand, you can omit it and slightly increase the oats or nuts to compensate, though the bars might be less protein-packed.
Can I substitute the maple syrup with another sweetener?
Absolutely! Honey works wonderfully as a natural sweetener, and you can also experiment with agave syrup or brown rice syrup. Just make sure whatever you use is liquid to maintain the right consistency.
How do I keep the bars from being too sticky?
Pressing the mixture firmly into the pan and chilling fully is key. Also, using peanut butter that’s not oil-separated helps with firmness. If they’re still too sticky after chilling, pop them back in the fridge a little longer.
Are these bars suitable for a vegan diet?
Yes, as long as you use maple syrup instead of honey and choose a plant-based protein powder, this Peanut Butter Protein Bars Recipe is completely vegan-friendly and just as delicious.
Final Thoughts
There’s something incredibly satisfying about making your own snack bars, and this Peanut Butter Protein Bars Recipe strikes the perfect balance between nourishing and indulgent. Whether as a post-exercise refuel or a quick bite on a busy day, these bars are bound to become a staple in your kitchen. Give it a try—you might just discover your new favorite go-to snack!
“`
Print
Peanut Butter Protein Bars Recipe
- Prep Time: 15 minutes
- Cook Time: 10 minutes
- Total Time: 1 hour 10 minutes
- Yield: 10 servings
- Category: Snack
- Method: Stovetop
- Cuisine: American
- Diet: Vegetarian
Description
These Peanut Butter Protein Bars are a delicious and nutritious homemade snack packed with protein and wholesome ingredients. Perfect for a quick energy boost, they combine creamy peanut butter, rolled oats, and protein powder for a chewy texture with optional dark chocolate chips and nuts for added flavor and crunch. Easy to make and no baking required, these bars are great for meal prep and on-the-go snacking.
Ingredients
Wet Ingredients
- 1 cup peanut butter (creamy or crunchy)
- ¼ cup maple syrup or honey
- 2 tbsp coconut oil
Dry Ingredients
- 1 ½ cups rolled oats
- ½ cup protein powder (vanilla or unflavored)
Optional Add-ins
- ¼ cup dark chocolate chips
- ¼ cup chopped nuts or seeds
Instructions
- Prepare the Pan: Line an 8×8-inch baking pan with parchment paper, making sure to leave extra paper hanging over the edges for easy lifting of the bars after they set.
- Melt Wet Ingredients: In a saucepan over low heat, combine the peanut butter, maple syrup (or honey), and coconut oil. Stir continuously until the mixture is smooth and fully blended, then remove from heat.
- Mix Dry Ingredients: Add the rolled oats and protein powder to the melted wet mixture. Stir well until all ingredients are evenly combined. If using, fold in the dark chocolate chips and chopped nuts or seeds to distribute them throughout the mixture.
- Press & Chill: Transfer the mixture into the prepared pan. Press down firmly and evenly using the back of a spatula or your hands to compact the mixture into a uniform layer. Place the pan in the refrigerator and chill for 1 to 2 hours, or until the bars are firm to the touch.
- Slice & Store: Once the bars have set, carefully lift them out of the pan using the parchment paper edges. Cut into 10 to 12 bars depending on preferred size. Store the bars in an airtight container in the refrigerator for up to one week, or freeze them for longer storage up to three months.
Notes
- You can substitute maple syrup with honey or agave nectar depending on preference.
- Use your favorite protein powder; vanilla enhances sweetness, while unflavored keeps it neutral.
- The optional chocolate chips and nuts add texture and extra flavor but can be omitted for a simpler bar.
- Pressing the mixture firmly into the pan helps bars hold together better once chilled.
- For a firmer texture, chill the bars overnight.
- When freezing, wrap bars individually in plastic wrap to prevent freezer burn.

