“`html
If you have a sweet tooth that craves a creamy, crunchy, and utterly delightful dessert, this Oreo Delight Recipe will become your new best friend. It combines the rich, chocolatey goodness of Oreo cookies with layers of smooth cream cheese, fluffy whipped topping, and luscious chocolate pudding for a dessert that feels like a party in every bite. Simple to make, yet so indulgent, this treat is perfect for sharing with friends or sneaking a little slice just for yourself.
Ingredients You’ll Need
The magic of the Oreo Delight Recipe lies in its straightforward ingredients that play together perfectly to create layers of texture and flavor. Each component adds its own special touch, from the creamy base to the crunchy cookie crust, making this dessert irresistible.
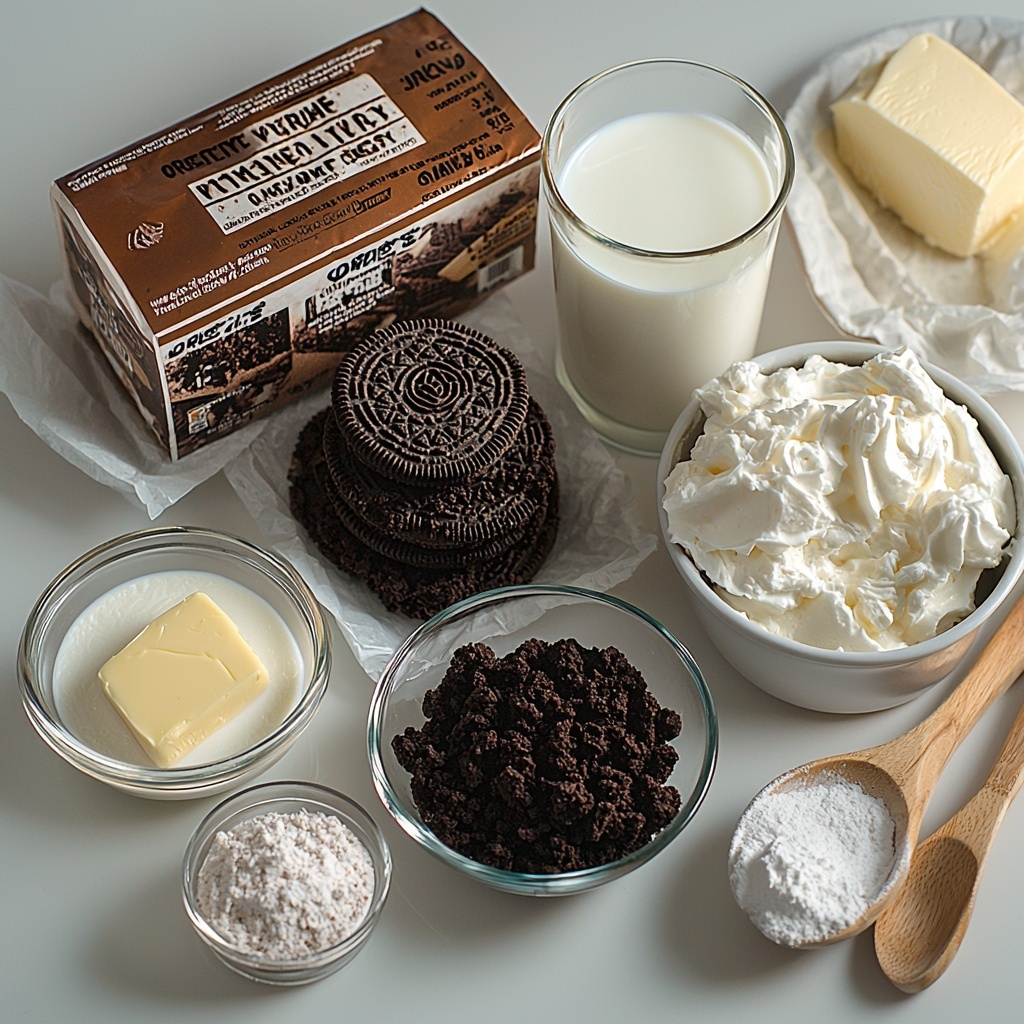
- 1 (5.9-ounce) package instant chocolate pudding mix: This brings rich chocolate flavor and a silky texture that sets the mood for the dessert.
- 2 3/4 cup milk: Essential for activating the pudding mix and giving it that creamy consistency.
- 1 (14.3-ounce) package regular Oreo cookies (about 35 cookies): The star ingredient providing the signature crunch and cocoa flavor that Oreo lovers adore.
- 4 tablespoons unsalted butter (melted): Adds richness and helps bind the Oreo crumbs into a perfect crust.
- 1 (16-ounce) container frozen whipped topping (Cool Whip) (thawed and stirred): Light and fluffy, it lifts the dessert to cloud-like softness.
- 1 (8-ounce) block cream cheese (softened): Adds tangy creaminess that balances the sweetness and adds depth.
- 1 cup powdered sugar: Sweetens and smooths the cream cheese layer, making it heavenly.
How to Make Oreo Delight Recipe
Step 1: Whisk the Pudding
Start by mixing the instant chocolate pudding mix with milk in a large bowl. Whisk it thoroughly until combined, then let it sit to thicken. Watching it set into a creamy pudding is the first sign that deliciousness is on its way.
Step 2: Crush the Oreos
Next, crush the entire bag of Oreo cookies. You can use a food processor for speed or channel your inner chef by placing the cookies in a zip-top bag and gently breaking them with a meat mallet or rolling pin. Set aside one cup of these Oreo crumbs for the topping later on – it’s the final flourish that adds crunch and charm.
Step 3: Make the Oreo Crust
In a medium bowl, combine the remaining crushed Oreos with melted butter, mixing until the crumbs are fully coated. Press this mixture firmly into the bottom of a 9×13-inch pan to create the crust. For an even surface, use the flat bottom of a dry measuring cup – this crust is the solid foundation of your Oreo Delight Recipe.
Step 4: Prepare the Cream Cheese Layer
In another bowl, beat the softened cream cheese until smooth and creamy. Add powdered sugar and mix until fully blended. Now, gently fold in about half of the whipped topping – take care not to over-mix, or you might lose that airy texture. Spread this luscious cream cheese mixture evenly over your Oreo crust.
Step 5: Add the Chocolate Pudding
Pour the thickened chocolate pudding over the cream cheese layer, smoothing it out carefully. This pudding layer is where the dessert gets its dreamy, melt-in-your-mouth richness.
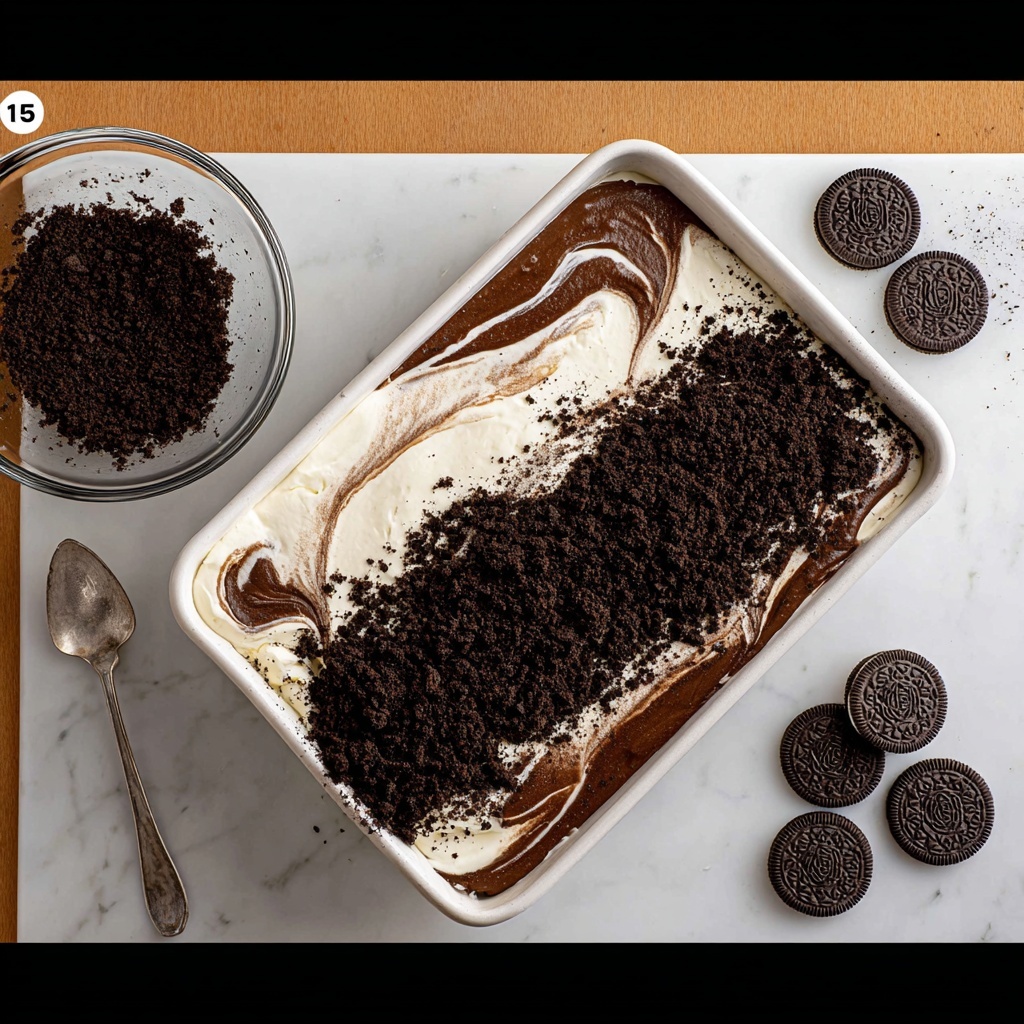
Step 6: Top with Whipped Topping and Oreo Crumbs
Spread the remaining whipped topping on top of the pudding, creating a light, fluffy crown. Finally, sprinkle the reserved Oreo crumbs generously over the whipped topping. This garnish not only makes the dish look gorgeous but adds that perfect finishing crunch.
Step 7: Chill and Serve
Cover your beautiful creation and refrigerate for at least 4 hours. This chill time lets all those flavors meld and the dessert firm up so you can slice it neatly. Once chilled, cut into 12 generous servings and get ready to indulge.
How to Serve Oreo Delight Recipe
Garnishes
While the Oreo crumbs on top provide a classic finish, consider adding a drizzle of chocolate syrup or a few fresh berries to introduce a pop of color and an extra layer of flavor that complements the dessert’s richness.
Side Dishes
This dessert is rich enough to stand on its own but pairs wonderfully with a simple cup of hot coffee or a glass of cold milk to balance the decadence. If you want to get fancy, a scoop of vanilla ice cream is always a winning companion.
Creative Ways to Present
For a stunning twist, serve this Oreo Delight Recipe in individual clear cups or mason jars. Layer the components and top with whipped cream and cookie crumbs just before serving. This presentation makes portion control easy and the dessert feel extra special.
Make Ahead and Storage
Storing Leftovers
Keep your Oreo Delight Recipe covered tightly in the refrigerator to preserve freshness and moisture. Stored this way, it stays delicious for up to 5 days, making it perfect for prepping ahead or enjoying later without losing any magic.
Freezing
While this dessert is best enjoyed fresh, you can freeze it for up to one month. Be sure to wrap it well with plastic wrap and foil to prevent freezer burn. Thaw overnight in the refrigerator before serving to maintain the perfect texture.
Reheating
Since this is a no-bake, chilled dessert, reheating is not recommended. It’s designed to be enjoyed cold, so just take it out of the fridge a few minutes before serving to slightly soften for easier slicing.
FAQs
Can I use a different cookie instead of Oreos?
Absolutely! While Oreos give this recipe its iconic flavor, you can experiment with chocolate wafers, chocolate chip cookies, or even peanut butter cookies for a fun twist that suits your taste.
Is it possible to make this dessert dairy-free?
You can substitute dairy-free cream cheese, a plant-based whipped topping, and dairy-free milk alternatives with instant pudding made from scratch to create a dairy-free version that still tastes fantastic.
How long does it take for the pudding to thicken?
After whisking the pudding mix with milk, it usually takes around 5 minutes to set and thicken to the perfect consistency before layering it in the dessert.
Can I prepare this dessert a day ahead?
Yes! In fact, making the Oreo Delight Recipe a day ahead allows the flavors to develop beautifully. Just be sure to refrigerate it well-covered to keep it fresh.
Can I add nuts or other mix-ins?
Feel free to sprinkle chopped nuts like pecans or walnuts on top of the crust or mix-ins to add extra texture and flavor. Just be mindful of textural balance so the Oreo Delight Recipe remains delightfully creamy and crunchy.
Final Thoughts
There is something truly special about the Oreo Delight Recipe that brings a smile with every forkful. It’s a celebration of simple ingredients coming together in layers of luscious flavor and texture. Whether you’re preparing it for a crowd or just treating yourself, this dessert promises to be a crowd-pleaser that’s easy to love and even easier to make. Give it a try and prepare to have a new favorite dessert in your repertoire!
“`
Print
Oreo Delight Recipe
- Prep Time: 20 minutes
- Cook Time: 0 minutes
- Total Time: 4 hours 20 minutes
- Yield: 12 servings
- Category: Dessert
- Method: No-Cook
- Cuisine: American
Description
Oreo Delight is a no-bake, layered dessert featuring a crunchy Oreo cookie crust, creamy cream cheese and whipped topping layer, instant chocolate pudding, and topped with more Oreo crumbs for a delightful texture and flavor combination. Ready in just 30 minutes plus chilling time, it is perfect for parties, family gatherings, or a sweet treat any day.
Ingredients
Crust
- 1 (14.3-ounce) package regular Oreo cookies (about 35 cookies)
- 4 tablespoons unsalted butter (melted)
Pudding Layer
- 1 (5.9-ounce) package instant chocolate pudding mix
- 2 3/4 cups milk
Cream Cheese Layer
- 1 (8-ounce) block cream cheese (softened)
- 1 cup powdered sugar
- 1 (16-ounce) container frozen whipped topping (Cool Whip), thawed and stirred
Instructions
- Prepare the pudding: In a large bowl, whisk together the instant chocolate pudding mix and milk until well combined. Set aside to allow the pudding to thicken.
- Crush the Oreo cookies: Using a food processor or manually with a rolling pin or meat mallet inside a zip-top bag, crush the entire package of Oreos. Reserve 1 cup of the crushed Oreo crumbs for topping.
- Make the crust: In a medium bowl, mix the remaining Oreo crumbs with the melted butter. Press this mixture firmly into the bottom of a 9×13-inch pan to form an even crust, using the bottom of a dry measuring cup for an even layer.
- Prepare the cream cheese layer: In another bowl, beat the softened cream cheese until smooth. Add the powdered sugar and mix well. Gently fold in about half of the whipped topping container, being careful not to over-mix to prevent the topping from collapsing.
- Assemble the cream cheese layer: Spread the cream cheese and whipped topping mixture evenly over the Oreo crust.
- Add the pudding layer: Spread the thickened chocolate pudding carefully over the cream cheese layer for a smooth, even coating.
- Top with whipped topping and Oreo crumbs: Spread the remaining half of the whipped topping on top of the pudding layer, then sprinkle the reserved Oreo crumbs evenly over the whipped topping.
- Chill and serve: Cover the dessert and refrigerate for at least 4 hours to set. Slice into 12 servings and enjoy! Store any leftovers covered in the refrigerator for up to 5 days.
Notes
- Use a 9×13-inch pan for best layering and serving size.
- Be careful not to over-mix the whipped topping when folding it into the cream cheese, or it may become runny.
- Allow the dessert to chill thoroughly for best texture and flavor.
- For a stronger chocolate flavor, consider using double chocolate Oreos.
- You can substitute light or reduced-fat versions of cream cheese and whipped topping for a lighter dessert.


