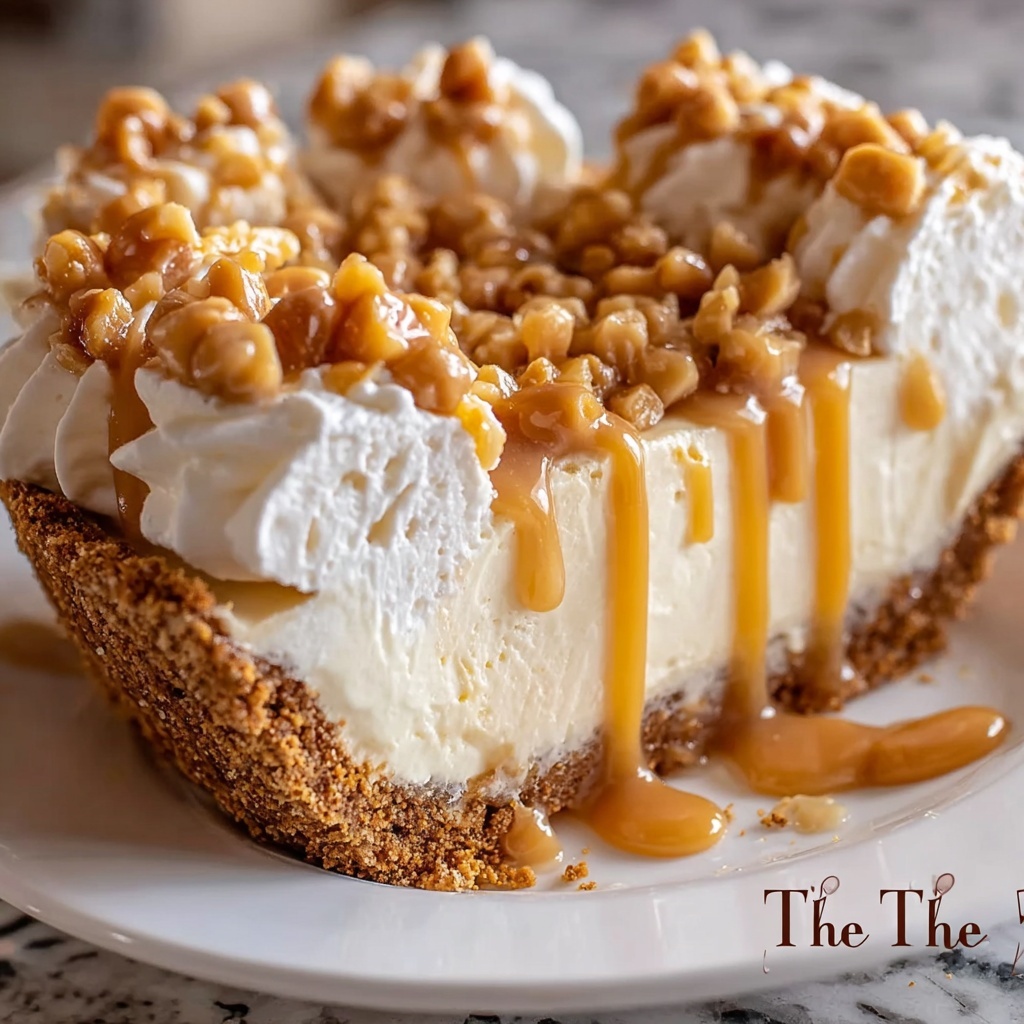
If you have a sweet tooth and are craving something creamy and dreamy without turning on your oven, this No-Bake Butterscotch Pie Recipe is exactly what you need. Imagine biting into velvety butterscotch-flavored filling that melts in your mouth, resting atop a crunchy graham cracker crust—all effortlessly whipped up and chilled to perfection. It’s a luscious, indulgent dessert that looks impressive but is surprisingly simple to make, perfect for those days when you want a homemade treat without the fuss.
Ingredients You’ll Need
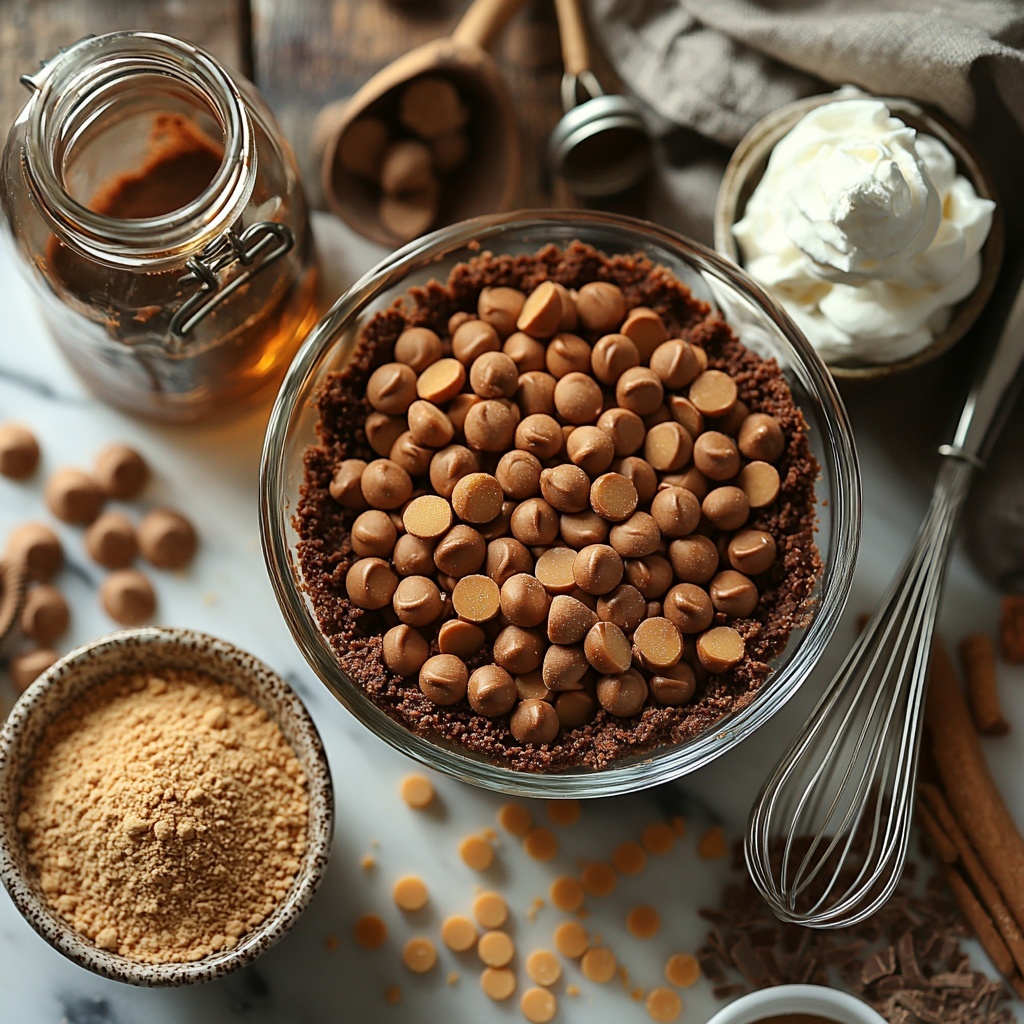
To whip up this delightful pie, you’ll only need a handful of humble staples. Each ingredient plays its own starring role, from the sweet richness of butterscotch chips to the light, airy texture contributed by the whipped cream. These ingredients come together to create a luscious pie that’s bursting with flavor and just the right amount of sweetness.
- Butterscotch chips: The heart of the pie’s flavor, melting down smoothly to create that rich, buttery taste we all love.
- Unsweetened cocoa powder: Adds a subtle depth of flavor and balances the sweetness so your pie stays perfectly nuanced.
- Heavy cream: Whipped to perfection, it gives the pie its creamy, melt-in-your-mouth texture.
- Powdered sugar: Sweetens the whipped cream gently without any graininess.
- Vanilla extract: Enhances and rounds out the flavor profile with a warm, fragrant note.
- Pre-made graham cracker crust: Provides a buttery, crunchy base that’s both convenient and delicious.
How to Make No-Bake Butterscotch Pie Recipe
Step 1: Melt the Butterscotch Chips
Start by gently melting your butterscotch chips in a saucepan over low heat. Take your time here so the chips melt evenly without burning—this step lays down that signature butterscotch flavor that fills every bite of your pie.
Step 2: Whip the Heavy Cream
While the chips are melting, whip the heavy cream in a separate bowl until soft peaks form. This is where the magic of lightness begins, creating a fluffy foundation that keeps the pie from feeling too dense.
Step 3: Add Powdered Sugar and Vanilla to Cream
Next, gradually stir in the powdered sugar and vanilla extract to the whipped cream, continuing to whip until you reach stiff, glossy peaks. This sweetens and flavors the cream, making it luscious and stable enough to hold its shape once combined.
Step 4: Fold in the Melted Butterscotch
Carefully fold the warm melted butterscotch into the whipped cream mixture. Take your time folding gently until everything is beautifully blended, ensuring you keep the airy texture intact without overmixing.
Step 5: Fill the Graham Cracker Crust
Pour the rich butterscotch filling into your pre-made graham cracker crust. Smooth out the top with a spatula so it looks as inviting as it tastes, setting the stage for that perfect slice.
Step 6: Chill Until Set
Refrigerate the pie for at least 4 hours—or better yet, overnight—until it is completely set. This resting time allows the filling to firm up and the flavors to meld beautifully.
Step 7: Serve and Enjoy!
Once chilled, your no-bake masterpiece is ready to be sliced and served. Enjoy the luscious texture and rich butterscotch flavor that only this No-Bake Butterscotch Pie Recipe can deliver.
How to Serve No-Bake Butterscotch Pie Recipe
Garnishes
To elevate your pie even more, think about topping it with a dollop of fresh whipped cream, a sprinkle of toasted pecans, or a drizzle of caramel sauce. These little touches add texture and burst of complementary flavors that will wow your guests and make each bite sensational.
Side Dishes
This pie pairs delightfully with a simple cup of freshly brewed coffee or a scoop of vanilla ice cream. The creaminess of the pie balances well against bitter coffee notes or the cold sweetness of ice cream, creating a perfectly rounded dessert experience.
Creative Ways to Present
For a fun twist, serve your No-Bake Butterscotch Pie Recipe in individual clear glasses layered with crushed graham crackers and small chunks of butterscotch candy. Or sprinkle edible gold dust for a festive flair when entertaining—your guests will be impressed by both taste and presentation!
Make Ahead and Storage
Storing Leftovers
Leftover pie should be tightly covered with plastic wrap or kept in an airtight container in the refrigerator. It will stay fresh and maintain its texture for up to 3 days, making it a perfect make-ahead treat.
Freezing
You can freeze this no-bake pie, but be sure to wrap it well with foil and plastic wrap to avoid freezer burn. When stored properly, it can last for up to 1 month in the freezer. Let it thaw in the fridge overnight before serving to preserve the creamy texture.
Reheating
This pie is best enjoyed cold and isn’t meant to be reheated. Instead, simply taking it out of the refrigerator a few minutes before serving will soften the texture slightly, giving you the perfect creamy experience without any need for heat.
FAQs
Can I use a homemade graham cracker crust instead of a pre-made one?
Absolutely! A homemade crust adds a personal touch and allows you to control the sweetness and butteriness. Just make sure it’s well chilled before filling with the butterscotch mixture for best results.
Is there a dairy-free version of this recipe?
You can substitute heavy cream with coconut cream and look for dairy-free butterscotch chips or make a homemade butterscotch sauce. This way, you’ll still enjoy a luscious pie that fits dairy-free diets.
Why is cocoa powder included in the ingredients?
Adding unsweetened cocoa powder provides a subtle depth of flavor and balances the pie’s sweetness, creating a more complex taste profile without turning the pie chocolatey.
How long does the pie need to chill before serving?
Refrigerate the pie for a minimum of 4 hours to let it fully set, but overnight chilling is ideal to develop the best texture and flavor.
Can this pie be made ahead for parties?
Yes! This No-Bake Butterscotch Pie Recipe is perfect for make-ahead entertaining. Prepare it a day or two in advance to free up your time on the day of your event.
Final Thoughts
There’s something incredibly satisfying about making a dessert that feels indulgent but comes together so simply, and this No-Bake Butterscotch Pie Recipe absolutely fits the bill. I encourage you to try it the next time you want to impress your friends or treat yourself to a special slice of heaven without heating up your kitchen. It’s creamy, dreamy, and guaranteed to delight every bite of the way!
Print
No-Bake Butterscotch Pie Recipe
- Prep Time: 20 minutes
- Cook Time: 5 minutes
- Total Time: 4 hours 25 minutes
- Yield: 8 servings
- Category: Dessert
- Method: No-Cook
- Cuisine: American
Description
Indulge in this creamy, luscious No-Bake Butterscotch Pie that combines the rich sweetness of melted butterscotch with a smooth whipped cream filling nestled in a crunchy graham cracker crust. Perfect for warm days or when you want a quick, fuss-free dessert that requires no baking. Refrigerate until set and enjoy a delightful treat that’s both elegant and easy to make.
Ingredients
Filling
- 1 cup butterscotch chips
- 1 cup heavy cream
- 1/2 cup powdered sugar
- 1 teaspoon vanilla extract
Additional
- 1/2 cup unsweetened cocoa powder
- 1 pre-made graham cracker crust
Instructions
- Melt Butterscotch: In a saucepan over low heat, gently melt the butterscotch chips, stirring occasionally until smooth and fully melted. Remove from heat and let cool slightly.
- Whip Cream: In a separate bowl, whip the heavy cream with an electric mixer until soft peaks form, indicating the cream holds shape but is still light.
- Add Sugar and Vanilla: Gradually add the powdered sugar and vanilla extract into the whipped cream while continuing to whip until stiff peaks form, creating a firm yet fluffy texture.
- Combine Mixtures: Carefully fold the melted butterscotch into the whipped cream mixture, mixing gently until fully incorporated and smooth without deflating the cream.
- Assemble Pie: Pour the butterscotch cream mixture into the pre-made graham cracker crust and smooth the top evenly with a spatula.
- Chill Pie: Refrigerate the pie for at least 4 hours or until the filling is set and firm enough to slice nicely.
- Serve: Once set, slice the pie and serve chilled for a delightful and refreshing dessert.
Notes
- Ensure the butterscotch chips are melted over low heat to avoid burning.
- Do not overwhip the cream initially; watch for soft and then stiff peaks carefully.
- Folding gently is key to keep the whipped cream light and airy.
- For added texture, garnish with whipped cream or butterscotch drizzle before serving.
- This pie is best consumed within 2 days for optimal freshness.


