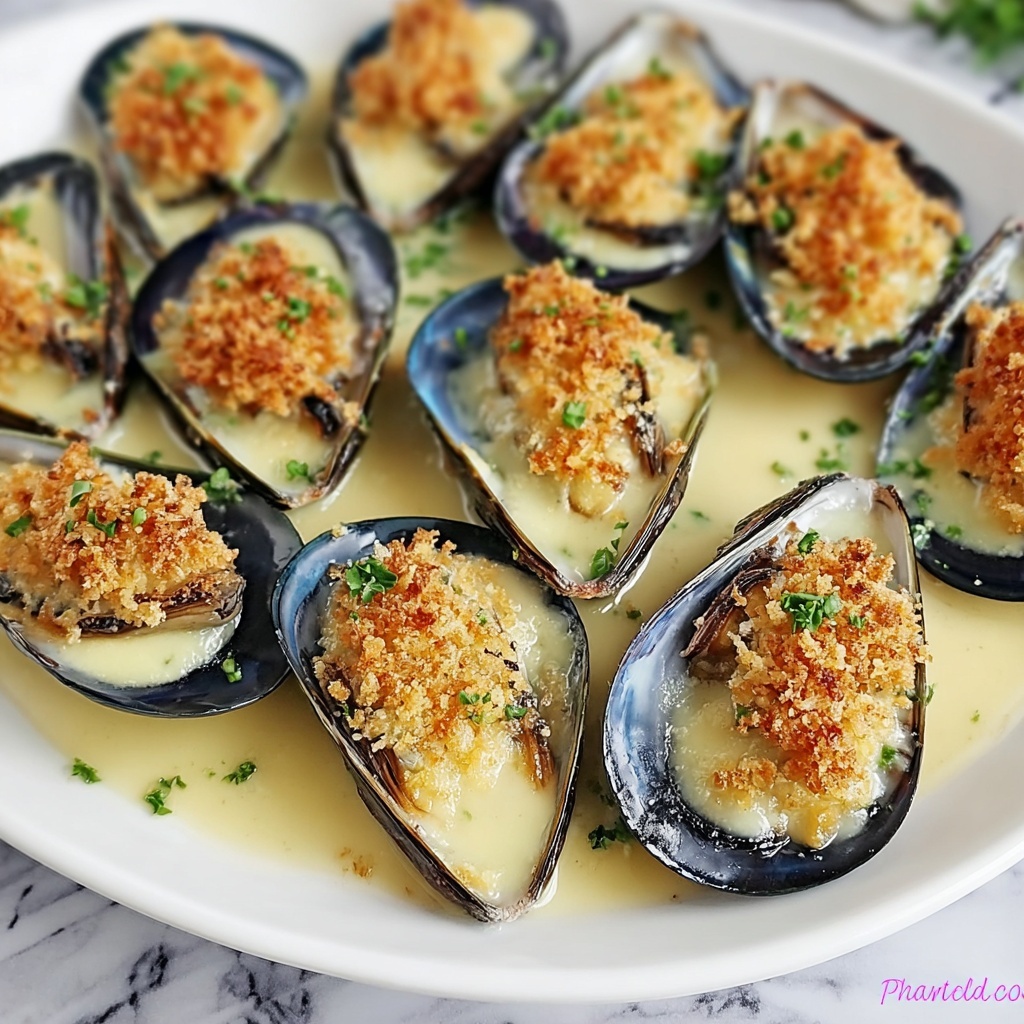
If you’re craving a dish that brings the ocean’s freshest flavors right to your kitchen with a rich, comforting twist, then this Irresistibly Creamy Stuffed Baked Mussels Recipe is about to become your new favorite. Imagine tender mussels nestled in their own shells, smothered in a luscious garlic-infused creamy béchamel, topped with bubbling golden cheese. It’s a perfect balance of briny seafood goodness and warm, indulgent creaminess that will have everyone asking for seconds. Whether for a special occasion or a cozy night in, this recipe is a true crowd-pleaser that’s surprisingly simple to prepare yet impressively elegant.
Ingredients You’ll Need
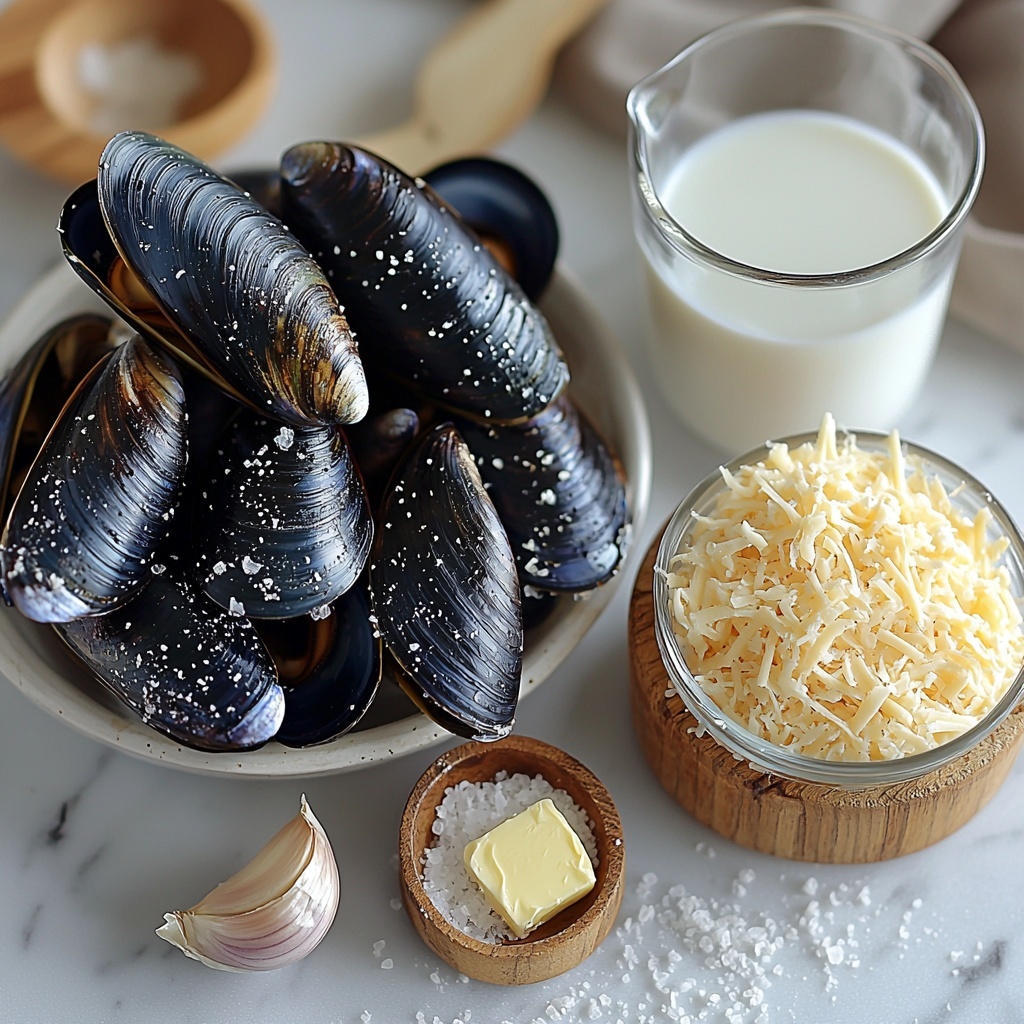
Gathering your ingredients for this dish is a breeze, and each one plays a crucial role in building layers of flavor and perfect textures. From fresh mussels to creamy milk and aromatic garlic, every component adds something special to bring this dish to life.
- 1 pound Fresh Mussels: Choose ones that are closed and squeaky clean for the best flavor and safety.
- 2 cloves Garlic (Minced): Garlic provides that irresistible aromatic punch that elevates the creamy sauce.
- 2 tablespoons Unsalted Butter: Adds richness and helps create the base for the béchamel sauce.
- 1 cup Breadcrumbs (Panko is recommended): Panko breadcrumbs add a light texture and help thicken the sauce.
- 1 cup Milk: Any milk works well; it gives the béchamel its creamy, smooth consistency.
- Salt (to taste): Enhances all the flavors perfectly without overpowering.
- 1 cup Quick-melt Cheese (Mozzarella works great): This melts beautifully to form the irresistible golden topping.
How to Make Irresistibly Creamy Stuffed Baked Mussels Recipe
Step 1: Prepare and Steam the Mussels
Start by cleaning your mussels carefully, scrubbing off any debris, and removing the beards. Place them in a pot with a splash of water and cover it to steam on low heat. Within 5 to 7 minutes, the shells will open—this signals they’re perfectly cooked. Carefully remove the top shell of each mussel to create a little vessel for the creamy stuffing. This step ensures the mussels are tender and easy to eat once baked.
Step 2: Make the Creamy Garlic Béchamel Sauce
In a medium saucepan, melt your butter over medium heat and gently sauté the minced garlic until fragrant—just about a minute. Next, toss in the panko breadcrumbs and stir for another minute to toast them lightly. Gradually whisk in the milk, stirring constantly to avoid lumps. This slow addition thickens the sauce beautifully over about five minutes, creating a silky, luscious texture. Season the sauce lightly with salt, then take it off the heat and allow it to cool slightly before assembling the mussels.
Step 3: Assemble and Bake the Mussels
Preheat your oven to 355°F (180°C). Line a baking tray with parchment paper for easy cleanup and arrange the mussel shells carefully. Spoon the creamy garlic béchamel generously into each half shell filled with mussel meat. Top each one with a good sprinkle of the quick-melting cheese. Pop the tray into the oven and bake for 10 to 15 minutes, until the cheese is visibly melted and browned to perfection. Let them cool a bit before serving so the sauce sets slightly—this way, each bite delivers maximum creaminess and flavor.
How to Serve Irresistibly Creamy Stuffed Baked Mussels Recipe
Garnishes
A sprinkle of freshly chopped parsley or a tiny drizzle of lemon juice over the mussels just before serving adds a bright, fresh note that perfectly complements the rich creaminess. For a little extra zing, add a pinch of red pepper flakes or a dash of smoked paprika—these simple garnishes make the dish feel even more special.
Side Dishes
These stuffed mussels shine when paired with light, fresh sides. A crisp green salad with a tangy vinaigrette cuts through the richness nicely. Alternatively, serve alongside crusty bread or garlic toast to soak up every last bit of that irresistible creamy sauce. For a fuller meal, steamed asparagus or grilled vegetables add lovely color and balance.
Creative Ways to Present
To impress your guests, arrange the mussels on a large platter lined with seaweed or crushed ice for a dramatic seafood display. You can also present them individually on small appetizer spoons, making them perfect for cocktail parties or elegant gatherings. Don’t forget to include small lemon wedges for just the right squeeze of citrus.
Make Ahead and Storage
Storing Leftovers
If you find yourself lucky enough to have leftovers, store them in an airtight container in the refrigerator. They stay fresh for up to 2 days, and you can enjoy the creamy goodness all over again with just a little reheating.
Freezing
While mussels are best enjoyed fresh, you can freeze the cooked mussels without the cheese topping. Place the shells and mussels in a freezer-safe container, but keep in mind that the texture might change slightly. Thaw completely before reheating and adding fresh cheese for baking.
Reheating
To bring your leftovers back to life, reheat the stuffed mussels in a preheated oven at 325°F (160°C) for about 10 minutes or until warmed through. This method keeps the sauce creamy and the cheese melted without drying them out. Avoid using a microwave if you want to maintain the best texture.
FAQs
Can I use frozen mussels for this recipe?
Fresh mussels are strongly recommended for the best flavor and texture in this recipe. Frozen mussels can sometimes be watery and less flavorful. If you must use frozen, thaw and drain them well, but expect slight differences in the final dish.
Is it necessary to remove one half of the mussel shell?
Yes, removing one half of the shell makes it easier to fill and eat the mussels. It also allows the béchamel and cheese to bake nicely over the mussel meat without overflowing or burning.
Can I substitute the cheese used in this recipe?
Absolutely! While quick-melt cheeses or mozzarella work best for that gooey, golden topping, feel free to experiment with other melting cheeses like Monterey Jack or Gruyère for a different flavor twist.
How do I know when the mussels are fresh and safe to eat?
Fresh mussels should be tightly closed before cooking. If any mussels are open and do not close when tapped, discard them as they may not be safe to eat. Also, ensure they have a fresh ocean smell and no strong fishy odor.
Can I prepare this dish ahead and bake just before serving?
Definitely! Assemble the stuffed mussels and refrigerate them covered for a few hours or overnight. When ready to serve, bake as directed. This makes entertaining much easier while still delivering that freshly baked goodness.
Final Thoughts
There’s something truly special about this Irresistibly Creamy Stuffed Baked Mussels Recipe that makes it a favorite for good reason. It’s a perfect harmony of simple ingredients coming together to create a dish that feels both luxurious and comforting. Give it a try—you’ll be amazed at how easily you can bring a restaurant-quality experience into your home kitchen, and your friends and family will be wowed by every creamy, cheesy bite.
Print
Irresistibly Creamy Stuffed Baked Mussels Recipe
- Prep Time: 10 minutes
- Cook Time: 30 minutes
- Total Time: 40 minutes
- Yield: 4 servings
- Category: Appetizer
- Method: Baking
- Cuisine: Seafood
Description
These irresistibly creamy stuffed baked mussels combine tender steamed mussels with a rich garlic béchamel sauce, topped with melty cheese and baked to golden perfection. Perfect as an elegant appetizer or a savory seafood treat that’s sure to impress any crowd.
Ingredients
Mussels
- 1 pound Fresh Mussels (Choose mussels that are closed and clean)
- to taste teaspoon Salt (Adjust to taste)
Garlic Béchamel Sauce
- 2 cloves Garlic (Minced)
- 2 tablespoons Unsalted Butter
- 1 cup Breadcrumbs (Panko is recommended)
- 1 cup Milk (Any type works well)
Topping
- 1 cup Quick-melt Cheese (Can substitute with mozzarella)
Instructions
- Clean and Steam Mussels: Thoroughly clean the mussels, scrubbing the shells and removing any beards. Place them in a pot with a small amount of water, cover with a lid, and cook over low heat for 5-7 minutes until the shells open. Discard any mussels that do not open. Remove the top half of each shell, saving the bottom half for stuffing.
- Prepare Garlic Béchamel Sauce: In a medium saucepan, melt 2 tablespoons of unsalted butter over medium heat. Add the minced garlic and sauté gently for 1 minute until fragrant. Stir in the breadcrumbs and cook for another minute to toast lightly. Slowly whisk in 1 cup of milk, continuing to stir until the mixture thickens into a creamy sauce, about 5 minutes. Season with salt to taste and allow to cool slightly.
- Preheat Oven and Arrange Mussels: Preheat the oven to 355°F (180°C). Line a baking tray with parchment paper. Place the cleaned mussel shells on the tray, open side up, ready for stuffing.
- Stuff Mussels and Add Cheese: Spoon the prepared garlic béchamel sauce evenly into each mussel shell. Generously top each with the quick-melt cheese or mozzarella to create a creamy, cheesy layer.
- Bake Mussels: Bake in the preheated oven for 10-15 minutes, or until the cheese is melted, bubbly, and golden brown. Remove from the oven and let cool slightly before serving to allow the flavors to set and avoid burning your mouth.
Notes
- Choose fresh mussels that are tightly closed before cooking to ensure safety and optimal flavor.
- If some mussels remain closed after steaming, discard them as they may be unsafe to eat.
- Use panko breadcrumbs for a lighter, crispier béchamel texture; regular breadcrumbs also work if unavailable.
- You can substitute quick-melt cheese with mozzarella or a mild cheddar for similar results.
- Serve this dish hot as an appetizer or part of a seafood platter.
- Adjust salt in the béchamel sauce carefully, especially if using salted butter or salty cheese.


