
If you’re craving a festive, rich dessert that’s both bite-sized and bursting with flavor, look no further than the Indulgent Hot Cocoa Peppermint Cheesecake Bites Recipe. These little treasures combine the classic creamy tang of cheesecake with the cozy warmth of cocoa and the refreshing zing of peppermint, making them perfect for holiday celebrations or anytime you want a sweet treat that feels special. Each bite delivers a harmonious blend of chocolate, mint, and that melt-in-your-mouth cheesecake texture that will have you coming back for more.
Ingredients You’ll Need
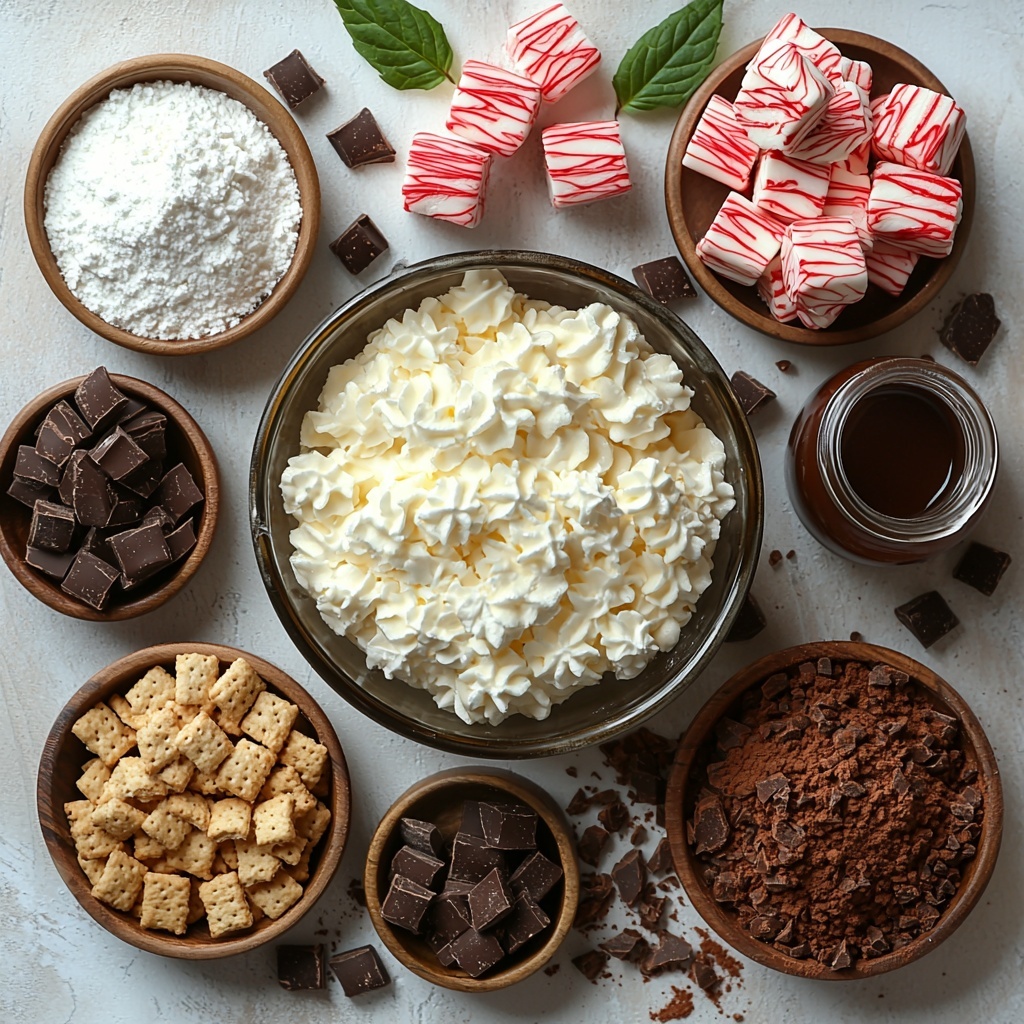
Gathering the right ingredients is essential for making the Indulgent Hot Cocoa Peppermint Cheesecake Bites Recipe a flawless success. Each component plays a vital role in balancing texture, flavor, and festive appeal, turning simple pantry staples into a spectacular dessert.
- 8 oz Cream Cheese (Softened, at room temperature): The creamy base that lends richness and smoothness to every bite.
- 1 cup Powdered Sugar (Adjust to taste): Provides sweetness without graininess and helps achieve a velvety texture.
- ½ cup Unsweetened Cocoa Powder (Quality cocoa recommended): Adds deep chocolate flavor and a hint of bitterness to balance sweetness.
- 1 tsp Peppermint Extract (Adjust based on preference): Delivers the refreshing minty kick that makes these bites uniquely festive.
- 1 cup Whipped Cream (Substitute with whipped coconut cream for dairy-free): Lightens the cheesecake mixture for a delicate, airy feel.
- 1½ cups Chocolate Graham Cracker Crumbs (Can substitute with regular or gluten-free): Forms the deliciously crumbly base that holds the bites together.
- ⅓ cup Melted Butter (Coconut oil works for dairy-free): Binds the crust and adds richness and moisture to the base.
- 1 cup Crushed Peppermint Candies (Add festive flair): Sprinkles throughout garland the bites with crunch and holiday cheer.
- Chocolate Syrup (to taste): A beautiful drizzle on top that amps up sweetness and chocolate indulgence.
How to Make Indulgent Hot Cocoa Peppermint Cheesecake Bites Recipe
Step 1: Prepare the Chocolate Crust
Start by mixing the chocolate graham cracker crumbs with the melted butter until all crumbs are moistened and hold together when pressed. This will become the irresistible base of your cheesecake bites, delivering a crunchy, chocolatey foundation that complements the creamy filling perfectly.
Step 2: Press Crust into Pan
Firmly press the crumb mixture into the bottom of a lined or greased 8×8-inch pan. Even pressure ensures the crust stays intact when cut into bites and provides an even surface for the cheesecake layer.
Step 3: Make the Cheesecake Filling
In a large bowl, beat the softened cream cheese with powdered sugar until completely smooth. Gradually whisk in the unsweetened cocoa powder and peppermint extract for that signature flavor. Finally, fold in the whipped cream gently to keep the mixture light and fluffy—this step is key to achieving the perfect melt-in-your-mouth texture.
Step 4: Combine Filling and Crushed Peppermint
Fold the crushed peppermint candies into the cheesecake filling. This distributes festive bits of crunch and bright mint flavor throughout each bite, making every forkful a delightful surprise.
Step 5: Spread the Filling Over the Crust
Spread the cheesecake mixture evenly over the prepared crust. Smooth the top with a spatula so that each bite has a uniform layer of creamy goodness balanced with that chocolate base.
Step 6: Chill to Set
Place the pan in the refrigerator and chill for at least 4 hours or overnight to let the cheesecake bite firm up properly. Patience here pays off with a sliceable, cohesive dessert ready for cutting.
Step 7: Cut and Drizzle
Once set, carefully cut the cheesecake into 12 equal bites. Finish them off by drizzling chocolate syrup on top for an additional layer of decadence and a pretty, glossy appearance.
How to Serve Indulgent Hot Cocoa Peppermint Cheesecake Bites Recipe
Garnishes
For an extra touch of sparkle and flavor, try topping each cheesecake bite with mini marshmallows, a sprinkle of additional crushed peppermint, or even a tiny dollop of whipped cream. These simple garnishes not only enhance presentation but also add texture contrasts and bursts of sweetness.
Side Dishes
Serve these cheesecake bites alongside a steaming mug of rich hot chocolate or a peppermint mocha for a cozy dessert duo. Fresh berries or a fruit compote can provide a nice tart counterpoint if you want to balance the richness.
Creative Ways to Present
Consider arranging the bites on a festive platter with candy canes, pine sprigs, or holiday-themed napkins underneath to elevate your dessert table. Wrapping individual bites in decorative cupcake liners also makes these perfect for gifting or party favors.
Make Ahead and Storage
Storing Leftovers
Indulgent Hot Cocoa Peppermint Cheesecake Bites keep beautifully in an airtight container in the refrigerator for up to 5 days. This makes them an ideal make-ahead dessert when planning for holidays or gatherings ahead of time.
Freezing
You can freeze the cheesecake bites for up to one month. Wrap each piece tightly in plastic wrap and place them in a sealed freezer-safe box to protect against freezer burn. Thaw overnight in the fridge before serving to retain their creamy texture.
Reheating
Because these cheesecake bites are best served chilled, reheating is not recommended. For the best taste and texture, simply enjoy them straight from the fridge after thawing if frozen.
FAQs
Can I use regular graham crackers instead of chocolate?
Absolutely! Regular graham crackers or gluten-free alternatives work just fine and offer a slightly different but delicious flavor profile. For a chocolate-focused bite, though, chocolate graham cracker crumbs add a lovely richness.
Is there a dairy-free version of this recipe?
Yes! Simply substitute cream cheese with vegan cream cheese, whipped cream with whipped coconut cream, and use coconut oil instead of melted butter. These swaps keep the indulgent flavor while accommodating dairy-free needs.
How strong is the peppermint flavor?
The peppermint extract amount is adjustable based on your preference. Start with 1 teaspoon, but if you love a bold minty punch, feel free to add more gradually while tasting to avoid overpowering the chocolate.
Can I prepare these bites in advance for a party?
Definitely! These cheesecake bites can be made a day or two in advance and stored in the fridge. They actually taste even better once chilled fully, making them perfect for stress-free entertaining.
How do I prevent the cheesecake bites from cracking?
Ensure your cream cheese is fully softened to avoid lumps and mix gently when folding in the whipped cream to maintain airiness. Also, chilling the bites properly helps them set well without cracking when cut.
Final Thoughts
There is something truly magical about the Indulgent Hot Cocoa Peppermint Cheesecake Bites Recipe that makes dessert time extra special. Whether you’re serving them at a party or enjoying them quietly at home, these little bites deliver big on flavor and festive spirit. So grab your ingredients and give this recipe a try—it’s sure to become a beloved holiday tradition or a go-to treat whenever you need a delicious pick-me-up.
Print
Indulgent Hot Cocoa Peppermint Cheesecake Bites Recipe
- Prep Time: 30 minutes
- Cook Time: 0 minutes
- Total Time: 4 hours 30 minutes (includes chilling time)
- Yield: 12 bites
- Category: Dessert
- Method: No-Cook
- Cuisine: American
- Diet: Vegetarian
Description
These Indulgent Hot Cocoa Peppermint Cheesecake Bites combine the rich creaminess of cheesecake with the festive flavors of peppermint and chocolate. Perfect for holiday gatherings or as a decadent treat, these no-bake cheesecake bites feature a luscious cocoa-infused filling atop a crunchy chocolate graham cracker crust, topped with crushed peppermint candies and a drizzle of chocolate syrup for an irresistible finish.
Ingredients
Crust
- 1½ cups Chocolate Graham Cracker Crumbs (Can substitute with regular or gluten-free)
- ⅓ cup Melted Butter (Coconut oil works for dairy-free)
Cheesecake Filling
- 8 oz Cream Cheese (Softened, at room temperature)
- 1 cup Powdered Sugar (Adjust to taste)
- ½ cup Unsweetened Cocoa Powder (Quality cocoa recommended)
- 1 tsp Peppermint Extract (Adjust based on preference)
- 1 cup Whipped Cream (Substitute with whipped coconut cream for dairy-free)
Toppings
- 1 cup Crushed Peppermint Candies (Add festive flair)
- Chocolate Syrup (To taste, drizzle on top for extra sweetness)
Instructions
- Prepare the crust: In a medium bowl, combine the chocolate graham cracker crumbs with the melted butter (or coconut oil). Mix until the crumbs are evenly moistened and resemble wet sand. Press this mixture firmly into the base of a lined or greased mini muffin tin or silicone mold, creating an even layer that will form the crust of the cheesecake bites.
- Mix the cheesecake filling: In a large mixing bowl, beat the softened cream cheese with powdered sugar until smooth and creamy. Add the unsweetened cocoa powder and peppermint extract, then continue mixing until fully incorporated and the filling is uniformly chocolate and peppermint flavored.
- Incorporate whipped cream: Gently fold the whipped cream (or whipped coconut cream for dairy-free) into the chocolate cream cheese mixture. This will lighten the texture, making the filling fluffy and airy, which is ideal for bite-sized treats.
- Fill the molds: Spoon or pipe the cheesecake filling over the prepared crusts in the mini muffin tin, filling each to the top. Tap the tin gently on the counter to level the filling and remove any air pockets.
- Chill to set: Cover the filled tin with plastic wrap and refrigerate for at least 4 hours, or until the cheesecake bites are firm and set. This allows the flavors to meld and the texture to solidify without baking.
- Add toppings: Once set, remove the cheesecake bites from the refrigerator and carefully pop them out of the molds. Sprinkle crushed peppermint candies generously on top of each bite, and drizzle with chocolate syrup to enhance the indulgence.
- Serve and enjoy: Arrange the peppermint cheesecake bites on a serving platter and serve chilled. These bites are perfect as a festive dessert or sweet snack during holiday celebrations.
Notes
- For a dairy-free version, substitute cream cheese with a dairy-free alternative and use whipped coconut cream instead of whipped cream.
- Adjust peppermint extract carefully, as it can be quite potent; start with less and add more to taste.
- Use high-quality unsweetened cocoa powder for the best chocolate flavor.
- The cheesecake bites require chilling but no baking, making them easy and quick to prepare ahead.
- Store leftovers in an airtight container in the refrigerator for up to 3 days to maintain freshness.


