
If you’re craving a nostalgic comfort snack with a clever twist, this Grilled Cheese Rollups Recipe is exactly what you need. Imagine the cozy goodness of classic grilled cheese packed into cute, handheld rolls that are perfectly crispy on the outside and ooey-gooey on the inside. It’s a simple, fun way to upgrade the beloved sandwich, making it ideal for quick lunches, snacks, or even party finger food. Plus, these rollups come together fast with just a few everyday ingredients you probably already have in your pantry.
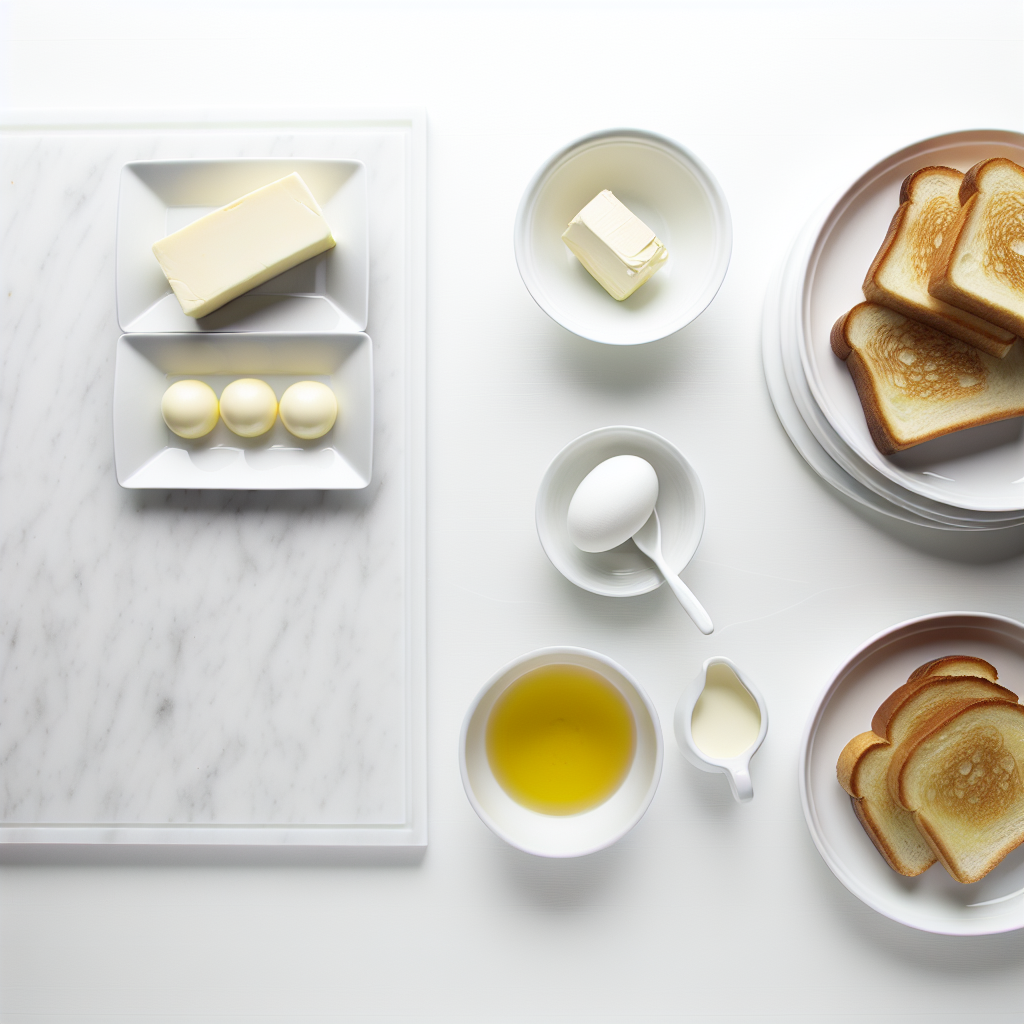
Ingredients You’ll Need
The beauty of this Grilled Cheese Rollups Recipe is in its simplicity. Each ingredient plays a vital role: the bread gives you the soft yet sturdy base, the cheese melts to create that irresistible gooey center, and the butter adds a richly golden, crispy crust that you’ll want to savor with every bite.
- 10 slices of Bread: Choose a soft, fresh sandwich bread for easy rolling and the perfect fluffy texture.
- 10 American Cheese Singles: Use the classic melty American cheese for that iconic smooth, creamy texture inside your rollups.
- Butter: Butter ensures a golden-brown, crispy exterior and adds a rich, buttery flavor that elevates the entire dish.
How to Make Grilled Cheese Rollups Recipe
Step 1: Prepare the Bread
Start by taking each slice of bread and cutting off the crusts. This step is essential because it allows the bread to roll up smoothly without cracking, giving you a neat, compact rollup. Then grab a rolling pin and gently flatten each slice until it’s thin but still sturdy enough to hold the cheese inside without tearing.
Step 2: Add the Cheese
Lay each flattened bread slice flat on a plate or cutting board, then place one American cheese single on top. The cheese acts as the delicious, melty heart of each rollup, so be sure that the slices fully cover the bread to get that ooey-gooey center with every bite.
Step 3: Roll It Up
Now for the fun part: carefully roll each bread slice and cheese combo into a tight spiral. Rolling firmly but gently ensures the cheese stays inside without oozing out during cooking, and your rollups hold their shape beautifully once they hit the pan.
Step 4: Cook the Rollups
Heat a pan over medium low and melt some butter, or you can spread a small amount of mayo on the outside of each rollup for an extra hint of flavor and a gorgeous golden crust. Place the rollups seam side down in the pan—that helps seal them closed and lock in their cheesy goodness. Cook them slowly, turning frequently so they brown evenly without burning. This gentle approach gives you crispy outside edges and perfectly melted insides every time.
Step 5: Final Crisp and Serve
Continue cooking and turning until all sides are beautifully browned. The cheese inside will be delightfully melted, and the outside will have a satisfyingly crunchy texture that makes these rollups addictive. Remove them from the heat and get ready to dig in!
How to Serve Grilled Cheese Rollups Recipe
Garnishes
To elevate these grilled cheese rollups, sprinkle a little chopped fresh parsley or chives for a pop of color and fresh flavor. A light dusting of smoked paprika also complements the buttery crust with a subtle smoky warmth that’s simply irresistible. Garnishes not only brighten up the plate but add a layer of taste that keeps every bite interesting.
Side Dishes
These rollups go wonderfully with classic sides like tomato soup or a crisp green salad to balance their richness. For a heartier meal, pair them with crunchy pickles or tangy coleslaw, which cut through the creamy cheese with refreshing zest. The contrasting textures and flavors make each bite more dynamic and satisfying.
Creative Ways to Present
For parties or kids’ lunches, slice the rollups into bite-sized pinwheels and serve them on a colorful platter with assorted dipping sauces like ranch, marinara, or honey mustard. You can also stack them in a mini sandwich tower or even thread them onto skewers for a playful presentation that everyone will love. Making the presentation fun adds to the joy of enjoying this comforting treat.
Make Ahead and Storage
Storing Leftovers
If you have any leftover grilled cheese rollups, keep them in an airtight container in the refrigerator for up to 2 days. They stay delicious, and reheating is quick and easy to bring back that crispy exterior and melty interior.
Freezing
You can freeze unbaked rollups by wrapping them individually in plastic wrap and placing them in a freezer-safe bag. When you’re ready to enjoy, thaw them in the fridge overnight and cook as usual. This is a fantastic time-saver for busy days when you want quick comfort food without the prep.
Reheating
To reheat, gently warm your leftover rollups in a skillet over medium-low heat or in the oven at 350°F (175°C) until they’re hot and crispy again. Avoid microwaving if you want to keep the crust crispy—nothing beats that satisfying crunch paired with gooey cheese!
FAQs
Can I use different types of cheese for this recipe?
Absolutely! While American cheese melts perfectly and gives that classic flavor, you can experiment with cheddar, mozzarella, or even pepper jack for a little kick. Just choose cheeses that melt well.
What if I don’t have a rolling pin? Can I still make these?
Yes! Use a clean bottle or even your hands to gently flatten the bread. The goal is to make the bread thin enough to roll without tearing, so just be gentle and patient.
Is it okay to use mayo instead of butter on the outside?
It’s more than okay—it’s delicious! Spreading a thin layer of mayo adds a tangy flavor and gives an extra crisp, golden finish to the rollups, making them even more irresistible.
Can I add fillings other than cheese?
Definitely! Feel free to add thin slices of ham, turkey, or even a few veggies before rolling for more variety. Just be mindful not to overfill so they stay nicely rolled.
How long does it take to cook the rollups?
Cooking on medium-low heat and turning frequently usually takes about 10 to 15 minutes total. This slow cooking ensures the rollups get perfectly browned without burning, and the cheese gets nicely melted inside.
Final Thoughts
This Grilled Cheese Rollups Recipe is pure comfort food joy packed into a delightful handheld treat. Whether you’re making a quick snack or feeding a crowd, these rollups bring out smiles with their crispy crusts and melty centers. I can’t wait for you to try making them at home and discover just how easy and fun it is to put this twist on a classic favorite!
Print
Grilled Cheese Rollups Recipe
- Prep Time: 5 minutes
- Cook Time: 20 minutes
- Total Time: 25 minutes
- Yield: 5 servings
- Category: Snack
- Method: Frying
- Cuisine: American
Description
Delicious and easy-to-make Grilled Cheese Rollups, featuring flattened bread slices rolled with American cheese, cooked to golden perfection in butter for a crispy, cheesy treat that’s perfect for a quick snack or appetizer.
Ingredients
Ingredients:
- 10 slices of Bread
- 10 American Cheese Singles
- Butter (for cooking, about 2 tablespoons)
Instructions
- Prepare the Bread: Take each slice of bread and cut off the crusts. Then, use a rolling pin to flatten the bread slices evenly to make them easier to roll.
- Add Cheese: Place each flattened bread slice flat on a plate or cutting board. Add one piece of American cheese single on top of each bread slice.
- Roll Up Bread and Cheese: Carefully roll up each bread slice with the cheese inside, forming a compact roll.
- Heat the Pan and Add Butter: Place butter into a pan over medium-low heat, allowing it to melt and coat the surface. Alternatively, you can spread a small amount of mayonnaise on the outside of the rollups to help with browning.
- Cook the Rollups: Place the rollups seam side down in the pan. Cook them until they turn golden brown, turning frequently to avoid burning and ensure even cooking on all sides.
Notes
- Removing crusts and flattening the bread helps to roll smoothly and evenly.
- Spreading mayonnaise instead of butter on the outside creates a crispy golden crust with a slightly different flavor.
- Turn rollups frequently to avoid burning and achieve even browning.
- Serve warm for the best cheesy, gooey texture.
- Feel free to experiment by adding herbs, spices, or other fillings inside the rollups.

