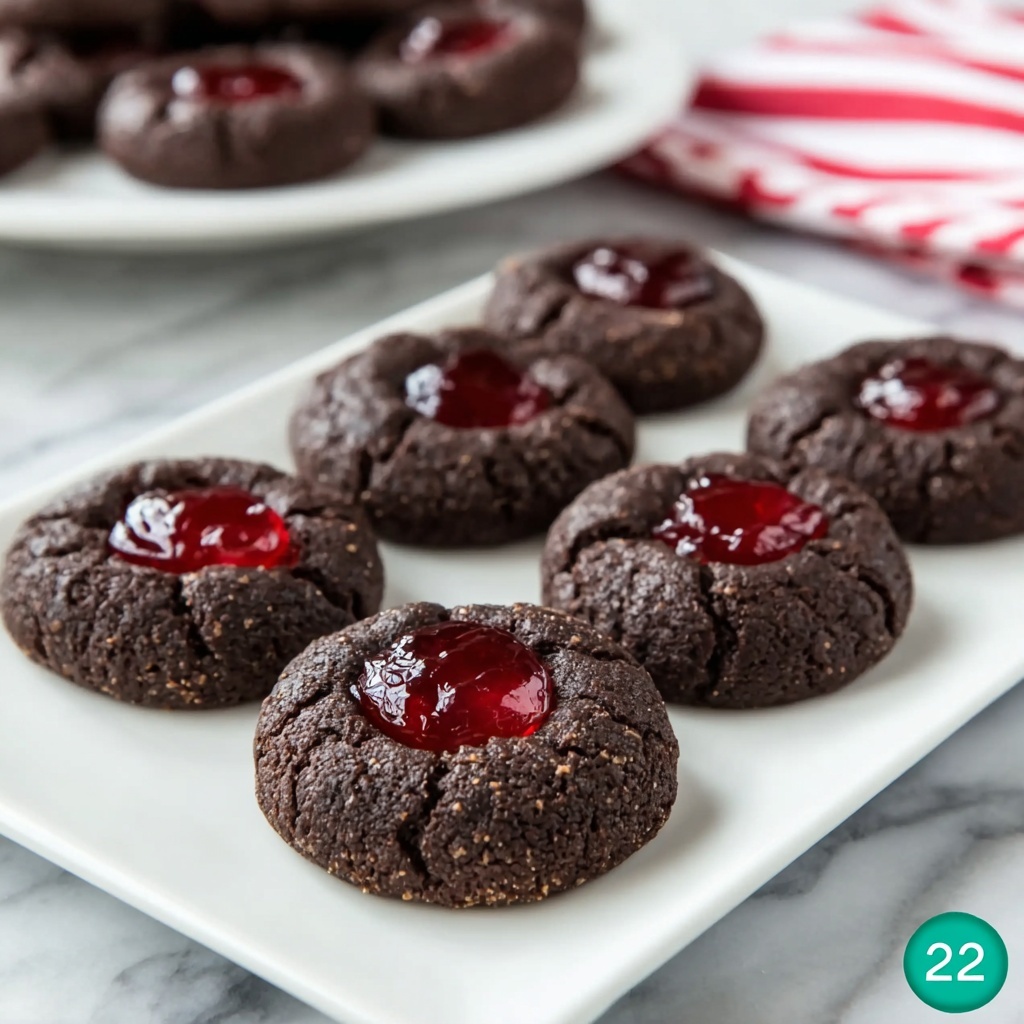
If you have a soft spot for nostalgic yet sophisticated treats, then you are absolutely going to adore this Easy Black Forest Thumbprint Cookies – Chocolate, Cherry, and Simple to Make Recipe. These cookies are a delightful blend of rich chocolate, juicy cherry preserves, and that truly irresistible thumbprint design that makes every bite feel special. Whether you’re baking for a holiday gathering or craving something sweet with a hint of romance, these cookies combine classic flavors with an easy, approachable method that anyone can master. You’ll be amazed at how the simple ingredients come together to create such a luscious, melt-in-your-mouth experience!

Ingredients You’ll Need
Gathering the right ingredients for your Easy Black Forest Thumbprint Cookies – Chocolate, Cherry, and Simple to Make Recipe is part of the magic. Each component plays a crucial role: from the creamy butter that brings tenderness, to the cocoa powder for that deep chocolate flavor, and of course, the vibrant cherry preserves that add a pop of fruity sweetness.
- Unsalted butter (1 cup or 2 sticks): Softened butter gives the cookie its tender crumb and rich flavor.
- Granulated sugar (3/4 cup): Adds sweetness while helping create a slight crisp edge.
- Large egg (1, room temperature): Binds the dough and adds moisture for a perfect chewy texture.
- Pure vanilla extract (2 teaspoons): Enhances all the flavors with a warm, inviting aroma.
- All-purpose flour (2 cups): The sturdy base that holds the cookie structure together.
- Unsweetened cocoa powder (1/3 cup): Provides that classic chocolate intensity—Dutch-process or natural both work.
- Baking powder (1/2 teaspoon): Gives the cookies a gentle lift without changing texture.
- Fine salt (1/2 teaspoon): Balances sweetness and deepens the overall flavor.
- Almond extract (1/2 teaspoon, optional): Adds a subtle Black Forest flourish if you want to keep it authentic.
- Cherry preserves or cherry jam (3/4 cup): The star of the show, picking seedless preserves will fill your cookies with pure fruity bliss.
- Semi-sweet chocolate, chopped (3 ounces): For drizzling a glossy, decadent finish on top.
- Neutral oil (1 teaspoon): A touch of canola or coconut oil helps the chocolate drizzle flow with ease.
How to Make Easy Black Forest Thumbprint Cookies – Chocolate, Cherry, and Simple to Make Recipe
Step 1: Preheat and Prep Your Workspace
First things first, get your oven warmed up to 350°F (175°C). Lining your baking sheets with parchment paper will save you a lot of cleanup time and prevents the cookies from sticking. Preparing ahead creates a smooth baking flow so you can focus on the fun part—making the cookie dough.
Step 2: Cream Butter and Sugar
In a large bowl, beat the softened butter and sugar together until the mixture becomes light, fluffy, and creamy—this usually takes about 2 to 3 minutes. This step is crucial because it introduces air into the dough, resulting in tender, melt-in-your-mouth cookies.
Step 3: Add the Egg and Extracts
Next, stir in the egg, vanilla, and optional almond extract until everything is well combined. Make sure to scrape down the sides of the bowl to avoid any unevenness in the dough. The almond extract, while optional, brings that unmistakable Black Forest liqueur-inspired aroma without the alcohol.
Step 4: Whisk Dry Ingredients Separately
Take a moment to sift together the flour, cocoa powder, baking powder, and salt in a separate bowl. This not only breaks up any cocoa lumps but also ensures your cookies are evenly chocolatey with a slight rise where it counts.
Step 5: Combine Dry and Wet Ingredients
Gently add the dry mix to the butter mixture and blend on low speed until just combined. The dough should feel soft and pliable without being sticky. Overmixing can cause tougher cookies, so take care here!
Step 6: Shape the Cookie Dough
Use a tablespoon or a small cookie scoop to portion the dough into balls, about 1 inch in diameter. Place the dough balls 2 inches apart on your prepared baking sheets to allow room for spreading.
Step 7: Make Thumbprints
Using your thumb or the back of a half-teaspoon measuring spoon, gently press a shallow well in the center of each dough ball. If cracks form around the edges, simply smooth them back together for a cleaner finish. This indentation is what hold the luscious cherry filling, so make sure it’s just right!
Step 8: Fill with Cherry Preserves
Before spooning, give the cherry preserves a gentle stir to loosen any settling. Then dollop about half a teaspoon of jam into each thumbprint. Filling the wells nearly to the top guarantees each bite bursts with sweet cherry goodness.
Step 9: Bake to Perfection
Pop the sheets into the oven and bake for 10 to 12 minutes. You’re looking for set edges with slightly firm bottoms while keeping the centers soft and tender. The smell while baking will have everyone lingering near the oven door!
Step 10: Cool Completely on a Rack
Allow your cookies to rest on the baking sheet for about 5 minutes before transferring to a wire rack. Cooling fully is essential so the chocolate drizzle will set nicely afterward.
Step 11: Melt the Chocolate Drizzle
Combine the chopped semi-sweet chocolate and neutral oil in a microwave-safe bowl. Heat in 20-second bursts, stirring between intervals, until silky smooth and glossy. The oil ensures your drizzle isn’t stiff but beautifully fluid.
Step 12: Drizzle and Let Set
Using either a spoon or a piping bag, artistically drizzle the melted chocolate across your cooled cookies. Allow the drizzle to firm up at room temperature, or refrigerate for 10 minutes to speed things along. Now your Easy Black Forest Thumbprint Cookies – Chocolate, Cherry, and Simple to Make Recipe are ready to impress!
How to Serve Easy Black Forest Thumbprint Cookies – Chocolate, Cherry, and Simple to Make Recipe
Garnishes
While these cookies are stunning on their own, a light dusting of powdered sugar can add a snow-kissed charm. Fresh cherries or even a tiny mint leaf on top elevate their presentation, giving your guests an extra hint of the luscious flavors contained within.
Side Dishes
These cookies pair wonderfully with a cup of black coffee, a creamy latte, or even a glass of cherry-infused tea. If you’re going all out, a scoop of vanilla bean ice cream makes a divine companion to the warm cherry and chocolate notes.
Creative Ways to Present
Consider arranging these cookies on a festive platter with seasonal fruit, like pomegranate seeds or sliced strawberries, for a burst of color. Wrapping individual treats in cellophane with a little ribbon is perfect for gifting or party favors, making your Easy Black Forest Thumbprint Cookies – Chocolate, Cherry, and Simple to Make Recipe not only delicious but utterly memorable.
Make Ahead and Storage
Storing Leftovers
Store your leftover cookies in an airtight container at room temperature for up to 4 days. Keeping them sealed tightly maintains their tenderness while allowing those delightful cherry centers to stay moist and fresh.
Freezing
If you want to keep these treats on hand longer, freeze the baked cookies in a single layer on a baking sheet first, then transfer them to a freezer-safe container or bag. They freeze beautifully for up to 3 months—just thaw at room temperature before serving to enjoy that fresh-baked feel.
Reheating
To revive the soft, chocolatey goodness, warm the cookies gently in the microwave for about 10 seconds. This melts the chocolate slightly and makes the cherry filling ooze just a bit, enhancing the indulgence factor.
FAQs
Can I substitute the cherry preserves with fresh cherries?
Fresh cherries can add a lovely twist, but since they contain more moisture, you’ll want to cook them down into a thicker jam-like consistency first to prevent soggy cookies and ensure the preserves set properly in the thumbprints.
Is almond extract necessary for this recipe?
Almond extract is optional but highly recommended for that authentic Black Forest flavor profile. If you don’t have it, vanilla alone still creates a delicious cookie—so no worries if you leave it out!
Can I use chocolate chips instead of chopped chocolate for the drizzle?
Absolutely! Chocolate chips work just fine for melting and drizzling. Just add a tiny bit of neutral oil to help thin the chocolate and achieve that perfect glossy finish.
How do I prevent the cookie edges from cracking when making thumbprints?
Press gently and avoid pushing too hard. If cracks appear, simply smooth the dough edges back together with your fingers before filling. Chilling the dough slightly before shaping can also help reduce cracking.
Can I make these cookies gluten-free?
Yes! Substitute the all-purpose flour with a beloved gluten-free blend that includes xanthan gum for structure. Just keep an eye on the dough’s texture as gluten-free flours can behave differently, and adjust as needed with a bit more flour if it feels too sticky.
Final Thoughts
There’s something truly special about sharing a homemade treat that feels both cozy and elegant. This Easy Black Forest Thumbprint Cookies – Chocolate, Cherry, and Simple to Make Recipe is one of my absolute favorites to bake and share, since it brings together so many classic flavors without a complicated process. I can’t wait for you to try it yourself—your kitchen will smell incredible, and your friends and family will be asking for the recipe in no time!
Print
Easy Black Forest Thumbprint Cookies – Chocolate, Cherry, and Simple to Make Recipe
- Prep Time: 15 minutes
- Cook Time: 12 minutes
- Total Time: 52 minutes
- Yield: 24 cookies
- Category: Dessert
- Method: Baking
- Cuisine: American
Description
These Easy Black Forest Thumbprint Cookies combine rich chocolate with sweet cherry preserves for a delightful treat perfect for any occasion. Soft, tender, and topped with a luscious chocolate drizzle, these cookies are simple to prepare and guaranteed to impress.
Ingredients
Cookie Dough
- 1 cup (2 sticks) unsalted butter, softened
- 3/4 cup granulated sugar
- 1 large egg, room temperature
- 2 teaspoons pure vanilla extract
- 2 cups all-purpose flour
- 1/3 cup unsweetened cocoa powder (Dutch-process or natural)
- 1/2 teaspoon baking powder
- 1/2 teaspoon fine salt
- 1/2 teaspoon almond extract (optional but adds Black Forest aroma)
Filling & Topping
- 3/4 cup cherry preserves or cherry jam (seedless if possible)
- 3 ounces semi-sweet chocolate, chopped (or chocolate chips)
- 1 teaspoon neutral oil (canola or coconut) for drizzling
Instructions
- Preheat and prep: Heat the oven to 350°F (175°C). Line two baking sheets with parchment paper for easy cleanup.
- Cream the butter and sugar: In a large bowl, beat the softened butter and sugar until light and creamy, about 2–3 minutes. This creates a tender, slightly fluffy cookie.
- Add egg and extracts: Mix in the egg, vanilla, and almond extract (if using) until combined. Scrape the bowl so everything blends evenly.
- Whisk dry ingredients: In a separate bowl, whisk together the flour, cocoa powder, baking powder, and salt to break up any cocoa lumps.
- Combine the dough: Add the dry ingredients to the butter mixture. Mix on low just until the dough comes together. It should be soft but not sticky.
- Shape the cookies: Scoop about 1 tablespoon of dough and roll into smooth balls. Place 2 inches apart on the prepared baking sheets.
- Make the thumbprints: Use your thumb or the back of a 1/2-teaspoon measuring spoon to press a shallow well in the center of each ball. If the edges crack, gently nudge them back together.
- Fill with cherry preserves: Stir the preserves to loosen. Spoon about 1/2 teaspoon into each well, filling nearly to the top but not overflowing.
- Bake: Bake for 10–12 minutes, until the edges look set and the bottoms are slightly firm. The centers should remain soft.
- Cool completely: Let cookies cool on the sheet for 5 minutes, then transfer to a wire rack. Cool completely before drizzling.
- Melt the chocolate: Microwave the chocolate and oil in 20-second bursts, stirring between each, until smooth and glossy.
- Drizzle and set: Use a spoon or piping bag to drizzle over the cooled cookies. Let the chocolate set at room temperature or chill for 10 minutes to speed it up.
Notes
- For the best texture, ensure butter is softened but not melted before creaming with sugar.
- If you prefer a stronger cherry flavor, try using cherry preserves with a higher fruit content.
- Almond extract is optional but adds a classic Black Forest cake aroma to the cookies.
- Make sure not to overfill the thumbprints to prevent spills during baking.
- Store cookies in an airtight container at room temperature for up to 5 days or freeze for longer storage.


