
“`html
If you are looking for an indulgent treat that feels like a little moment of magic, the Cool Whip Chocolate Candy Detox Recipe is your new best friend. This luscious dessert combines silky melted chocolate with the light, fluffy texture of whipped topping to create a candy that’s both rich and airy, perfect for sharing or savoring all by yourself. It’s surprisingly simple to make, yet every bite melts in your mouth, delivering a perfect balance of smooth sweetness and creamy delight. Trust me, once you try this, it will become a go-to recipe whenever a chocolate craving calls your name.
Ingredients You’ll Need
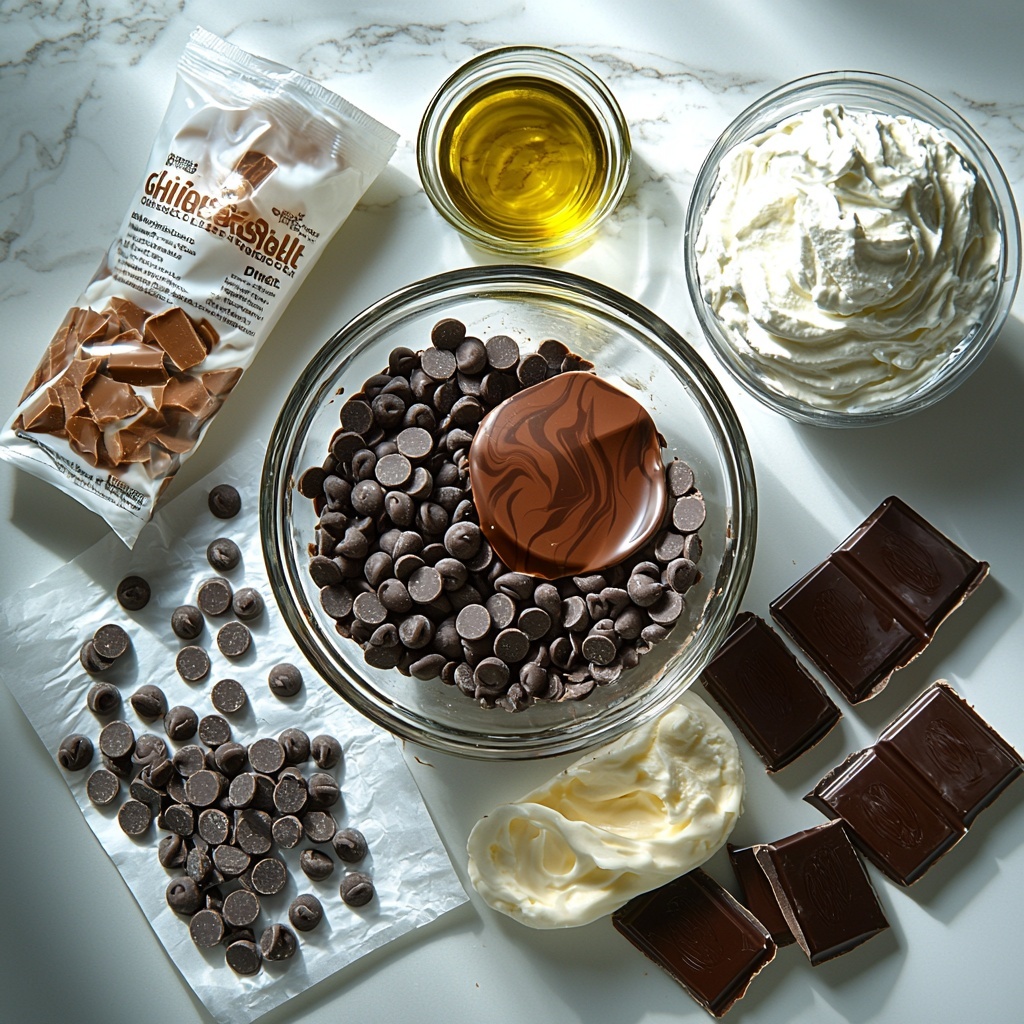
This recipe keeps it delightfully uncomplicated with just a handful of ingredients, each carefully chosen to build a dessert that sings with flavor and texture. The combination of milk chocolate chips, whipped topping, and chocolate wafers creates layers of creaminess and crunch, while a touch of vegetable oil ensures that silky smooth finish.
- 11.5 ounces milk chocolate chips: The creamy base for our candy that melts perfectly to envelop every bite with smooth chocolate goodness.
- 8 ounces tub of frozen whipped topping (thawed at room temperature): Adds the light, fluffy texture that makes this candy uniquely soft and airy.
- 10 ounces bag of Ghirardelli chocolate melting wafers: For that glossy, professional-looking chocolate coating that seals in all the flavor.
- 2 tablespoons vegetable oil (divided): Helps the melted chocolate become perfectly smooth and easy to work with.
How to Make Cool Whip Chocolate Candy Detox Recipe
Step 1: Prepare Your Pan
Lining an 8×8-inch pan with parchment paper sets the stage for easy candy removal later on, so don’t skip this step. It also helps the candy cool evenly and keeps it from sticking.
Step 2: Melt the Milk Chocolate
Pop the milk chocolate chips into a microwave-safe bowl and heat at 50% power for 1 minute. Stir well, then add 1 tablespoon of vegetable oil to make the chocolate silky smooth. Reheat in 30-second bursts at half power, stirring between, until you achieve that perfect, glossy texture. This slow melt prevents burning and ensures your chocolate stays luscious.
Step 3: Stir in the Whipped Topping
Mix the thawed whipped topping into your melted chocolate. Use a rubber spatula to blend them thoroughly until the mixture is thick, smooth, and beautifully combined. The whipped topping adds an irresistible fluffiness that transforms this candy into a heavenly treat.
Step 4: Pour and Smooth the Mixture
Transfer the chocolate and whipped mixture to the prepared pan, scraping every last bit out with your spatula. Press the mixture evenly into the corners and flat against the edges, smoothing the surface so your candy sets perfectly flat.
Step 5: Chill Thoroughly
Refrigerate your pan for at least 6 hours or overnight to allow the candy to set firm. This cooling time lets the textures meld together and makes cutting the candy a breeze.
Step 6: Cut into Pieces
Once chilled, lift the candy out of the pan by the parchment paper edges. Use a sharp knife to make 5 evenly spaced cuts horizontally and vertically, creating around 36 perfectly sized pieces roughly 1½ inches each. Place these pieces on a baking sheet and return them to the fridge to stay firm while you prepare the coating.
Step 7: Melt the Chocolate Wafers
Repeat the melting process for the Ghirardelli wafers: microwave for 1 minute at 50% power, stir well, add the remaining tablespoon of vegetable oil, and heat in 30-second intervals until perfectly smooth. This coating chocolate will give your candies a shiny, irresistible finish.
Step 8: Dip the Candy
Using two forks or dipping tools, carefully dunk each candy piece into the melted chocolate, ensuring full coverage. Place the dipped candies back on the baking sheet and refrigerate again for 30 minutes to let the chocolate shell harden beautifully. This final step locks in all the creamy, dreamy goodness inside.
How to Serve Cool Whip Chocolate Candy Detox Recipe
Garnishes
Though already stunning on its own, you can sprinkle a pinch of crushed nuts, sea salt, or colorful edible glitter on top of the fresh chocolate coating before chilling to add extra flair and a delightful crunch contrast.
Side Dishes
This candy pairs wonderfully with a warm cup of coffee, a scoop of vanilla ice cream, or fresh berries to cut through the richness and balance the sweetness. It’s a versatile treat that complements many cozy moments.
Creative Ways to Present
Try arranging your Cool Whip Chocolate Candy Detox Recipe pieces in decorative boxes or tie them with pretty ribbons as charming gifts. Serving them alongside a cheese board with fruits and nuts also makes for an unexpected and delightful dessert spread.
Make Ahead and Storage
Storing Leftovers
Keep any leftover candy stored in an airtight container in the refrigerator for up to 3-4 days. This keeps the candy firm and delicious without drying out or losing its silky texture.
Freezing
If you want to keep your Cool Whip Chocolate Candy Detox Recipe longer, freeze it in a sealed container for up to a month. Just thaw in the fridge before serving to maintain that perfect texture.
Reheating
There’s no need to reheat this candy since it is best enjoyed cold and set. If the chocolate coating feels a bit hard straight from the fridge, allow the pieces to sit at room temperature for 5–10 minutes before digging in to let the flavors shine through.
FAQs
Can I use a different type of chocolate for this recipe?
Absolutely! While milk chocolate chips and Ghirardelli wafers give a classic sweet richness, you can experiment with dark or semi-sweet chocolate for a deeper flavor. Just be sure to adjust sweetness to your taste.
Is the whipped topping necessary?
The whipped topping is what gives the candy its unique airy texture, making it fluffy and light. Replacing it may affect the final texture significantly, so it’s best to use as directed for that signature softness.
Can I make smaller or larger pieces?
Definitely. Just keep in mind that smaller pieces will chill more quickly and may require less dipping time, while larger ones might need a bit longer to set properly inside the chocolate coating.
What if my chocolate seizes while melting?
This can happen if moisture gets into your chocolate. To fix it, add a small amount of vegetable oil or gently warm the mixture while stirring until smooth again. Using the recommended melting method helps prevent this problem.
Is this recipe kid-friendly?
Yes! This Cool Whip Chocolate Candy Detox Recipe is a fun, simple treat that kids will love helping to make and eating. Just be sure to supervise with the hot chocolate steps and chopping chocolate.
Final Thoughts
I can’t recommend the Cool Whip Chocolate Candy Detox Recipe enough if you want a dessert that feels fancy but is incredibly easy to whip up. It’s the kind of sweet treat that brightens your day with every bite, perfect to share or keep all to yourself. So go ahead, gather your ingredients, and enjoy creating this delightful chocolatey wonder tonight!
“`
Print
Cool Whip Chocolate Candy Detox Recipe
- Prep Time: 15 minutes
- Cook Time: 15 minutes
- Total Time: 6 hours 30 minutes
- Yield: 36 pieces
- Category: Candy
- Method: No-Cook
- Cuisine: American
Description
Cool Whip Candy is a delightful no-bake treat that combines melted chocolate, whipped topping, and a smooth chocolate coating. This easy-to-make candy offers a rich and creamy texture with a crisp chocolate shell, perfect for satisfying sweet cravings or sharing at parties.
Ingredients
Chocolate Mixture
- 11.5 ounces milk chocolate chips (one package)
- 8 ounces tub of frozen whipped topping (thawed at room temperature)
- 1 tablespoon vegetable oil (divided)
Chocolate Coating
- 10 ounces bag of Ghirardelli chocolate melting wafers
- 1 tablespoon vegetable oil (remaining)
Instructions
- Prepare Pan: Line an 8×8 inch pan with parchment paper, ensuring the paper extends over the edges for easy removal later.
- Melt Milk Chocolate Chips: Place the milk chocolate chips in a large microwave-safe bowl. Microwave at 50% power for 1 minute, then stir well. Add 1 tablespoon of vegetable oil and continue microwaving at 50% power in 30-second intervals, stirring between intervals, until the chocolate is silky smooth. Remove from microwave.
- Mix in Whipped Topping: Add the thawed whipped topping to the melted chocolate. Stir thoroughly with a rubber spatula until fully combined into a thick mixture.
- Pour Mixture into Pan: Transfer the chocolate and whipped topping mixture into the prepared 8×8 pan. Scrape the sides of the bowl carefully to gather all the mixture.
- Smooth Surface: Use the spatula to press and spread the mixture evenly, making it flush against the pan edges and filling all corners to create a flat, even surface.
- Chill Candy Base: Place the pan in the refrigerator and chill for at least 6 hours or overnight until firm.
- Cut Candy Pieces: Remove the set mixture from the pan by lifting the parchment paper. With a sharp knife, cut into approximately 1½ inch squares, making about 36 pieces.
- Chill Cut Pieces: Arrange the candy pieces on a large baking dish and return to the refrigerator to keep chilled while preparing the coating.
- Melt Chocolate Coating: Place the Ghirardelli chocolate melting wafers in a microwave-safe bowl. Microwave at 50% power for 1 minute and stir well. Add the remaining 1 tablespoon vegetable oil and continue microwaving at 50% power in 30-second intervals, stirring after each, until the chocolate is smooth and glossy. Remove from microwave.
- Dip Candy Pieces: Using two forks or candy dipping tools, dip each chilled candy piece into the melted chocolate, coating it completely. Place the coated pieces back onto the baking dish.
- Final Chill: After coating all pieces, place the baking dish back in the refrigerator for 30 minutes to set the chocolate coating before serving.
Notes
- Make sure the whipped topping is fully thawed at room temperature for optimal mixing with chocolate.
- Use parchment paper to easily lift and remove the candy slab and facilitate cutting.
- Microwaving chocolate at 50% power prevents overheating and seizing.
- Adding vegetable oil helps to keep the chocolate smooth and glossy for dipping.
- Work quickly when dipping to avoid melting the candy base.
- Store the candies in an airtight container in the refrigerator for up to one week.


