
If you’re looking for a joyful, delicious holiday treat that brings both nostalgia and sparkle to your festivities, look no further than my Christmas Sugar Cookies with Easy Icing Recipe. These charming cookies combine a perfectly tender, buttery base with vibrantly smooth icing that you can color and decorate any way you like. Whether you’re baking with kids, gifting to neighbors, or simply craving a cozy moment with a warm cup of cocoa, these cookies deliver that classic Christmas magic everyone loves, made simple and irresistible.
Ingredients You’ll Need
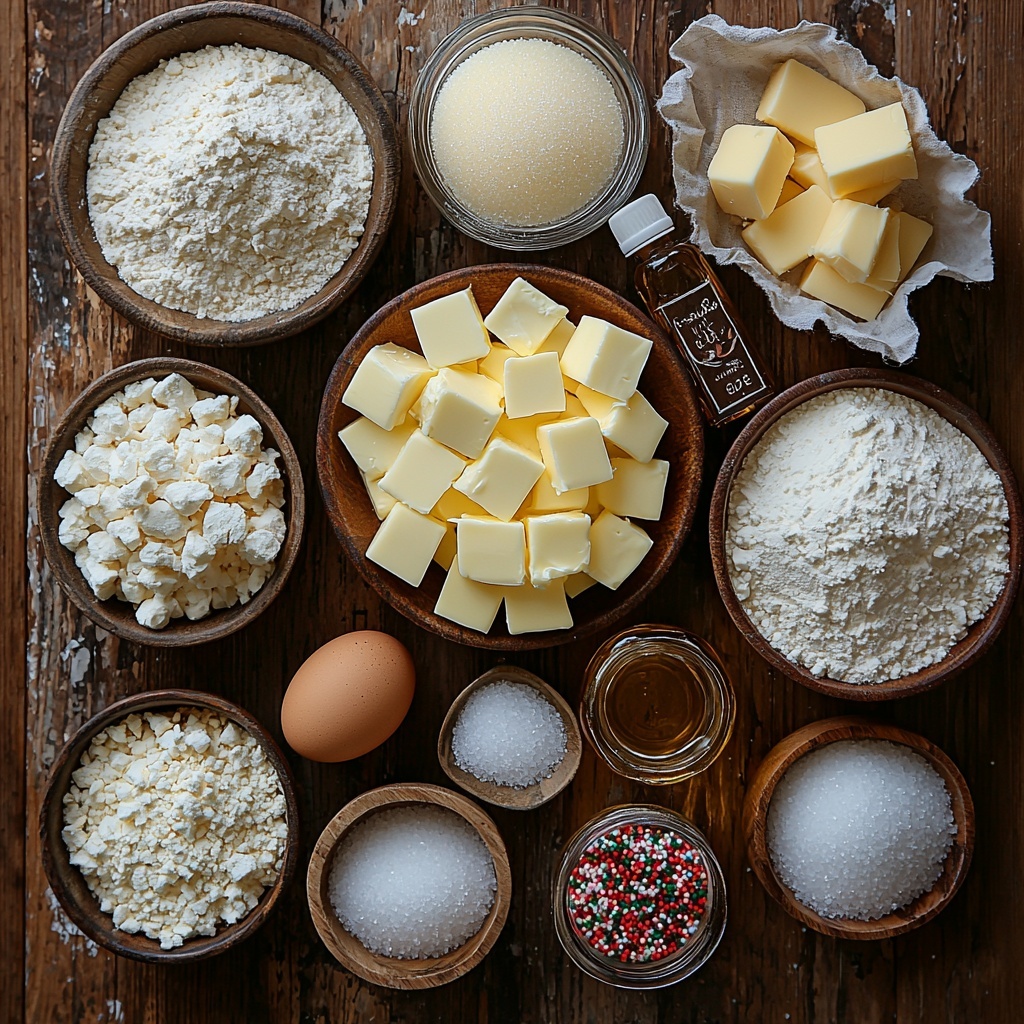
For this recipe, we’re keeping things straightforward with everyday pantry staples that work beautifully together, creating that perfect balance of sweet, buttery, and festive flavor and texture. Each ingredient plays a key role in making your Christmas Sugar Cookies with Easy Icing Recipe shine brightly both in taste and presentation.
- All-purpose flour (2 and 1/4 cups): The foundation that gives structure and just the right chew to your cookies.
- Baking powder (1/2 teaspoon): Helps the cookies rise slightly for a tender bite.
- Salt (1/4 teaspoon): Balances the sweetness and enhances overall flavor.
- Unsalted butter (3/4 cup, softened): Adds rich, creamy moisture essential for a soft and flavorful cookie.
- Granulated sugar (3/4 cup): Sweetens and aids in creating that light crumb without overpowering.
- Large egg (1, room temperature): Binds everything together and adds tenderness.
- Pure vanilla extract (2 teaspoons): Infuses the dough with warm, inviting notes.
- Almond extract (1/4 to 1/2 teaspoon, optional): Elevates flavor with a delicate nutty hint that makes this recipe unforgettable.
- Confectioners’ sugar (3 cups): For the icing, providing smoothness and a sweet shine.
- Light corn syrup (2 teaspoons): Gives the icing a beautiful gloss and perfect consistency.
- Room temperature water (4.5 to 5 tablespoons): Adjusts icing thickness for easy spreading and decorating.
- Pinch of salt (optional for icing): Balances the sweetness in the icing, rounding out the flavor.
- Gel food coloring & sprinkles (optional): For that festive pop of color and fun decorative touch.
How to Make Christmas Sugar Cookies with Easy Icing Recipe
Step 1: Prepare Your Time and Space
Start by making sure you have about two hours and plenty of counter space to work your Christmas cookie magic. Remember, chilling the dough and the cookies cooling fully before decorating is key. Also, if you want perfectly set icing, allowing a full 24 hours is ideal, but you can speed things up if you’re eager to enjoy them sooner.
Step 2: Mix the Dry Ingredients
In a medium bowl, whisk together all-purpose flour, baking powder, and salt. This ensures even distribution, giving your dough a consistent texture throughout.
Step 3: Cream Butter and Sugar
Using a mixer, beat the softened butter and granulated sugar on high for about 3 minutes until creamy and smooth. This step is crucial because properly creaming incorporates air, which gives your cookies a lovely lightness.
Step 4: Add Wet Ingredients
Beat in the egg, vanilla extract, and almond extract if you’re using it. Mix until everything is well combined—this develops the cookie’s rich flavor and smooth texture.
Step 5: Combine Wet and Dry Ingredients
Mix the flour mixture with the wet ingredients on low speed. If the dough feels too sticky to roll, sprinkle in a little extra flour, but be cautious to keep it soft enough to cut nicely.
Step 6: Roll and Chill the Dough
Divide the dough in two and roll each portion to about 1/4-inch thickness between two sheets of lightly floured parchment. Layer the rolled dough pieces with parchment in between, cover tightly, and chill for at least 1-2 hours or up to two days—this resting period helps develop flavor and makes rolling out easier.
Step 7: Cut and Prepare for Baking
Preheat your oven to 350°F (177°C). Remove one piece of dough from the fridge and use cookie cutters to create festive shapes. Don’t forget to re-roll the scraps to maximize the number of cookies!
Step 8: Bake the Cookies
Arrange cookie shapes on parchment-lined baking sheets about 3 inches apart. Bake for 11 to 12 minutes, until the edges start to take on a light golden hue. Let them cool on the tray briefly, then transfer to a wire rack to cool completely before decorating.
Step 9: Prepare the Easy Icing
Mix confectioners’ sugar, vanilla, light corn syrup, and 4.5 tablespoons water in a medium bowl. The icing will be thick initially — whisk in extra water a little at a time until it flows smoothly but holds its shape temporarily when drizzled.
Step 10: Add Color and Decorate
Divide the icing into bowls if you want multiple colors. Start with just 1 or 2 drops of gel food coloring, stirring until you reach the perfect shade. Use squeeze bottles or piping bags to outline and fill in your cookies. Add sprinkles right after icing for festive flair.
Step 11: Let Icing Set
Allow your decorated cookies to dry for up to 24 hours. You can speed this up by refrigerating them uncovered on a baking sheet, but the longer you wait, the neater your icing will stay.
Step 12: Store Properly
Once dry, keep your cookies at room temperature up to 5 days or refrigerate up to 10 days.
How to Serve Christmas Sugar Cookies with Easy Icing Recipe
Garnishes
Add a sprinkle of festive joy by topping your iced cookies with colorful sugar crystals, edible glitter, or tiny holiday-themed sprinkles. These enhance both appearance and texture, turning each cookie into its own little piece of edible art.
Side Dishes
Pair your Christmas Sugar Cookies with easy sides like a mug of hot cocoa topped with whipped cream, a cup of spiced apple cider, or a warm glass of eggnog. These drinks complement the sweetness and add cozy holiday vibes.
Creative Ways to Present
Arrange your decorated cookies on a festive platter garnished with fresh pine sprigs, cranberries, or cinnamon sticks. Alternatively, package them in cute boxes with shredded paper and ribbons—perfect for gifting neighbors or party guests.
Make Ahead and Storage
Storing Leftovers
Store leftover sugar cookies in an airtight container at room temperature for up to five days to keep them fresh and tasty. Layer cookies between sheets of parchment paper to protect the icing.
Freezing
Freeze undecorated or decorated cookies individually on a baking sheet, then transfer to a sealable freezer bag. This keeps them fresh for up to three months. Thaw at room temperature before serving or decorating.
Reheating
Sugar cookies are best enjoyed at room temperature, but if you prefer them warm, pop a cookie in the microwave for about 10 seconds. Avoid heating decorated cookies with icing, as this may cause the icing to melt or become sticky.
FAQs
Can I use margarine instead of butter in this Christmas Sugar Cookies with Easy Icing Recipe?
Butter is recommended because it provides superior flavor and texture that margarine can’t quite mimic. Margarine often contains more water or additives, which can affect cookie spread and taste.
How do I prevent my sugar cookies from spreading too much?
Proper chilling of the dough before baking helps prevent excessive spreading. Also, make sure your oven temperature is accurate and don’t overwork the dough.
What’s the best way to get a perfectly smooth icing?
Gradually add water to your confectioners’ sugar mixture and whisk until the icing drizzles smoothly but still holds its shape briefly. Using light corn syrup adds a lovely sheen and helps with consistency.
Can I make the dough or icing ahead of time?
Absolutely! Dough can be refrigerated up to two days before baking. Icing is best freshly made but can be stored covered at room temperature this way for a few hours. Just give it a quick stir before decorating.
How do I store decorated Christmas Sugar Cookies with Easy Icing Recipe to keep icing from smudging?
Allow icing to dry fully for 24 hours before stacking cookies. Store in a single layer or separate layers with parchment paper in an airtight container at room temperature.
Final Thoughts
Making these Christmas Sugar Cookies with Easy Icing Recipe is like creating a little holiday tradition right in your kitchen. Each step is a chance to fill your home with the smells and warmth of the season while crafting something that’s just as fun to decorate as it is to eat. Go ahead, gather your ingredients, roll up your sleeves, and bring some extra sweetness and joy to your celebrations this year—you won’t regret it!
Print
Christmas Sugar Cookies with Easy Icing Recipe
- Prep Time: 2 hours
- Cook Time: 12 minutes
- Total Time: 2 hours 12 minutes (plus 24 hours icing setting time if desired)
- Yield: 24 cookies (3-inch) and 1.5 cups icing
- Category: Dessert
- Method: Baking
- Cuisine: American
- Diet: Vegetarian
Description
Classic Christmas sugar cookies with a tender, buttery texture, perfectly complemented by a smooth, sweet, easy-to-make icing. These cookies are ideal for holiday decorating and gifting, featuring a simple dough that chills for perfect rolling and cut-outs, then baked to a delicate golden edge with a soft center. The icing can be tinted with food coloring and decorated with sprinkles to add festive cheer.
Ingredients
Cookie Dough
- 2 and 1/4 cups (281g) all-purpose flour (spooned and leveled), plus more as needed for rolling and work surface
- 1/2 teaspoon baking powder
- 1/4 teaspoon salt
- 3/4 cup (12 Tbsp; 170g) unsalted butter, softened to room temperature
- 3/4 cup (150g) granulated sugar
- 1 large egg, at room temperature
- 2 teaspoons pure vanilla extract
- 1/4 or 1/2 teaspoon almond extract (optional)
Icing
- 3 cups (360g) confectioners’ sugar
- 1/2 teaspoon pure vanilla extract (omit and replace with water for stark white icing)
- 2 teaspoons light corn syrup
- 4.5–5 Tablespoons (67–75ml) room temperature water
- Pinch salt (optional)
- Optional: gel food coloring & sprinkles for decorating
Instructions
- Plan Your Timing: Ensure you have enough time and counter space; dough chilling, cookie cooling, and icing setting require several hours. For hardened icing, allow 24 hours; for quicker enjoyment, 3-4 hours suffice.
- Mix Dry Ingredients: In a medium bowl, whisk together flour, baking powder, and salt. Set aside.
- Cream Butter and Sugar: Using a mixer with a paddle attachment, beat softened butter and sugar on high speed for about 3 minutes until smooth and creamy.
- Add Wet Ingredients: Beat in the egg, vanilla extract, and almond extract (if using) on high speed until fully combined, scraping sides as needed.
- Combine Dry and Wet: Add the dry ingredients to the wet mixture and mix on low speed until just combined. If dough is too soft to roll, add an additional tablespoon of flour.
- Divide and Roll Dough: Split dough into two equal parts. On lightly floured parchment paper or silicone mat, roll each to an even 1/4-inch thickness. Dust with flour as needed.
- Stack and Chill Dough: Dust one rolled dough lightly with flour, place parchment on top, then layer the second rolled dough atop. Cover with plastic wrap or foil and refrigerate for 1–2 hours or up to 2 days.
- Preheat Oven and Prepare Baking Sheets: Set oven to 350°F (177°C), line 2-3 baking sheets with parchment or silicone mats.
- Cut Cookies: Remove chilled dough top piece carefully. Use cookie cutters to cut shapes. Re-roll scraps and repeat with second piece.
- Arrange and Bake: Place cookies about 3 inches apart on sheets. Bake 11-12 minutes until edges lightly brown. Rotate pans if oven has hot spots. Cool on sheet for 5 minutes, then transfer to wire racks.
- Make Icing: Stir confectioners’ sugar, vanilla, corn syrup, 4.5 Tbsp water, and salt (if using) with a fork until thick. Switch to a whisk and add up to 0.5 Tbsp more water to reach a consistency where icing drizzles in a ribbon that holds shape briefly.
- Color Icing: Add gel food coloring 1-2 drops at a time, stirring to desired hue. Divide into bowls if using multiple colors.
- Decorate Cookies: Dip cookies, or pipe with squeeze bottles or bags fitted with small tips. Outline first, then flood. Add sprinkles immediately if desired.
- Set Icing: Let icing dry for 24 hours for a hardened finish. Cookies can be refrigerated on a baking sheet to speed up setting. No need to cover during drying.
- Store Cookies: Keep decorated cookies covered at room temperature up to 5 days or refrigerate up to 10 days.
Notes
- Almond extract is optional but enhances cookie flavor beautifully.
- If dough is sticky or too soft, add flour incrementally to stabilize.
- The icing should be slightly thick but pourable; adjust water slowly for best results.
- Gel food coloring is preferred for vibrant colors without thinning the icing.
- Cookies can be decorated before icing is fully dry but allow 24 hours for best set.
- Store iced cookies in airtight containers to maintain freshness.


