
If you have a soft spot for warm, buttery, and cheesy snacks, this Cheese Biscuits Recipe will quickly become your new best friend in the kitchen. These biscuits boast a delightful golden crust with a tender, cheesy crumb inside that feels like a comforting hug on a plate. Perfectly simple yet irresistibly flavorful, they’re the kind of treat that brings people together around the table with smiles and second helpings. Whether you’re baking for breakfast, a cozy dinner, or an impromptu snack, these cheese biscuits will not only satisfy your cravings but also impress anyone lucky enough to try them.
Ingredients You’ll Need
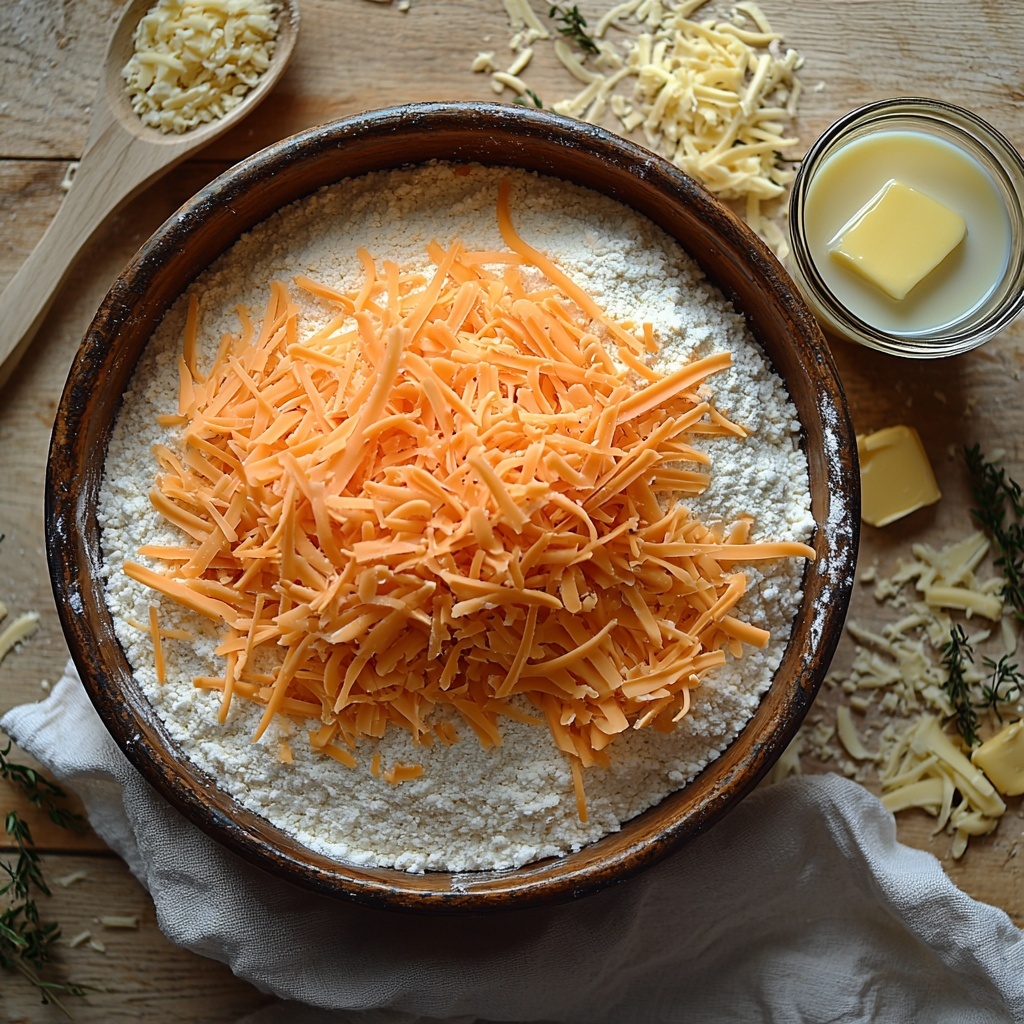
Getting started with this Cheese Biscuits Recipe is a breeze because the ingredients are straightforward and essential. Each one plays a special role to create those luscious biscuits that are soft, cheesy, and golden.
- Self-Rising Flour: This is your base that provides the light, fluffy texture without needing extra leaveners.
- Shredded Cheese: Choose cheddar, Gouda, or your favorite cheese for rich, melty pockets of flavor throughout the biscuits.
- Milk: Adding moisture, milk brings tenderness to the dough; almond milk works great for a dairy-free version.
- Butter (optional): Brushed on top before baking, butter adds a golden sheen and a delicious buttery aroma.
How to Make Cheese Biscuits Recipe
Step 1: Preheat Your Oven
Start by preheating your oven to 425°F (220°C). Getting the oven nice and hot ensures your cheese biscuits will rise perfectly and develop a beautiful golden crust.
Step 2: Prepare the Flour and Cheese
In a large mixing bowl, whisk 2 cups of self-rising flour to evenly distribute the leavening agents. Then fold in 1 to 2 cups of shredded cheese, depending on how cheesy you want your biscuits to be. This step ensures cheese is mixed evenly and you get bursts of cheesy goodness in every bite.
Step 3: Add the Milk and Form the Dough
Slowly pour in 1 1/3 cups of milk (almond milk works just as well if avoiding dairy) and gently mix everything together using a rubber spatula. Be careful not to over-mix; you want a soft dough that’s just combined for tender biscuits.
Step 4: Shape and Arrange on Baking Sheet
Shape the dough into small rounds using your hands or a spoon, and place them on a prepared baking sheet. Make sure to leave space between each biscuit so they can puff up beautifully.
Step 5: Add Butter and Bake
If you like, brush the tops with melted butter for that irresistible golden shine and buttery aroma. Bake the biscuits for 15 to 20 minutes until they are puffed up and perfectly golden brown on top.
Step 6: Cool and Enjoy
Let your cheese biscuits cool for a few minutes after baking. Serve them warm to enjoy that melty cheese and buttery soft texture in every bite.
How to Serve Cheese Biscuits Recipe
Garnishes
A sprinkle of fresh herbs like chives or parsley adds a lovely pop of color and fresh flavor that complements the rich, cheesy biscuit perfectly. Plus, a little cracked black pepper on top can give a subtle kick.
Side Dishes
Serve these cheese biscuits alongside hearty soups, like tomato basil or creamy potato, for a comforting meal. They also make a fantastic companion to salads or a charcuterie board filled with cured meats and spreads.
Creative Ways to Present
Take your presentation up a notch by slicing the biscuits in half and filling them with crispy bacon, a fried egg, or a dollop of your favorite jam. They transform effortlessly from a simple snack into a show-stopping appetizer or breakfast treat.
Make Ahead and Storage
Storing Leftovers
If you find yourself with extra cheese biscuits, simply store them in an airtight container at room temperature for up to 2 days. They maintain their soft texture well if kept properly wrapped.
Freezing
Cheese biscuits freeze beautifully! Wrap them individually in plastic wrap or place them in a freezer bag, and freeze for up to 3 months. This makes for a handy, delicious snack whenever craving strikes.
Reheating
To reheat, pop your biscuits in a preheated oven at 350°F (175°C) for about 5 to 7 minutes, or until warmed through and slightly crisp on the outside. This revives that fresh-baked texture like magic.
FAQs
Can I use other types of cheese for this Cheese Biscuits Recipe?
Absolutely! Feel free to experiment with different cheeses like mozzarella, pepper jack, or smoked gouda. Each cheese will add its own unique flavor and texture, making the biscuits your own.
Is it possible to make these biscuits gluten-free?
Yes, using a gluten-free self-rising flour blend will work just fine. Just make sure the flour blend includes a leavening agent, as that’s key for the biscuits to rise properly.
Can I make the dough ahead of time?
While the dough is best used immediately, you can prepare it and store it in the fridge for up to 24 hours. Bring it back to room temperature before shaping and baking for best results.
How cheesy can I make these biscuits?
As cheesy as your heart desires! You can add anywhere from 1 to 2 cups of shredded cheese depending on your preference. Just keep in mind that too much cheese might make the dough a bit denser.
Do I need to butter the tops before baking?
Brushing with butter is optional but highly recommended. It gives the biscuits a beautiful golden color and adds a lovely flavor that complements the cheese.
Final Thoughts
This Cheese Biscuits Recipe is one of those treasured recipes that feel like a warm embrace every time you bake them. Simple ingredients, effortless steps, and stunning results will have you turning to this recipe again and again. I truly hope you enjoy the delicious, cheesy, golden bites as much as I do—happy baking, my friend!
Print
Cheese Biscuits Recipe
- Prep Time: 10 minutes
- Cook Time: 15-20 minutes
- Total Time: 30-35 minutes
- Yield: 12 servings
- Category: Baking
- Method: Baking
- Cuisine: American
- Diet: Gluten Free
Description
Deliciously fluffy and cheesy biscuits made with self-rising flour and your choice of shredded cheese. These easy homemade biscuits are perfect for breakfast, as a snack, or served alongside your favorite meal. They are quick to prepare and bake to a golden brown perfection with a crispy exterior and soft, cheesy interior.
Ingredients
Dry Ingredients
- 2 cups Self-Rising Flour (gluten-free if needed)
- 1–2 cups Shredded Cheese (cheddar, Gouda, or your favorite)
Wet Ingredients
- 1 1/3 cups Milk (almond milk for dairy-free option)
- Butter (for brushing on top, optional)
Instructions
- Preheat Oven: Preheat your oven to 425°F (220°C) to ensure it reaches the right temperature for baking the biscuits evenly.
- Mix Flour: In a large mixing bowl, add the 2 cups of self-rising flour and whisk well to combine and aerate it for a light biscuit texture.
- Add Cheese: Fold in the shredded cheese (between 1 to 2 cups) carefully so the cheese is evenly distributed without overworking the dough.
- Add Milk: Slowly pour in 1 1/3 cups of almond milk (or regular milk) and mix gently with a rubber spatula until a soft dough forms.
- Shape Biscuits: Shape the dough into small rounds or biscuits using your hands or a spoon. Place them evenly spaced on a prepared baking sheet.
- Optional Butter Brush: Brush the tops of the biscuit dough rounds with melted butter to add flavor and help them brown beautifully.
- Bake Biscuits: Bake in the preheated oven for 15-20 minutes, or until the biscuits are golden brown and puffed up.
- Cool & Serve: Remove the biscuits from the oven and let them cool for a few minutes before serving warm to enjoy the best texture and flavor.
Notes
- You can customize the cheese type based on your preference, cheddar or Gouda work especially well.
- Using almond milk makes the recipe dairy-free, and gluten-free flour can be used to accommodate dietary needs.
- Brushing the biscuits with butter is optional but enhances the color and richness.
- Store leftover biscuits in an airtight container and reheat gently before serving.
- Self-rising flour contains baking powder and salt, so no additional leavening agents are required.


