
If you have ever dreamed of biting into the perfect summer treat that combines nostalgic campfire flavors with a cool, creamy twist, then you are absolutely going to adore this Frozen S’mores Sandwiches Recipe. Imagine layers of crunchy graham crackers hugging fluffy marshmallow cream and luscious chocolate pudding, all wrapped up in a delightfully chilled, creamy embrace. This dessert is pure magic for those hot days when you want the cozy charm of s’mores without the campfire or melting mess. It’s incredibly simple to make but delivers big on joy and indulgence every single time.
Ingredients You’ll Need
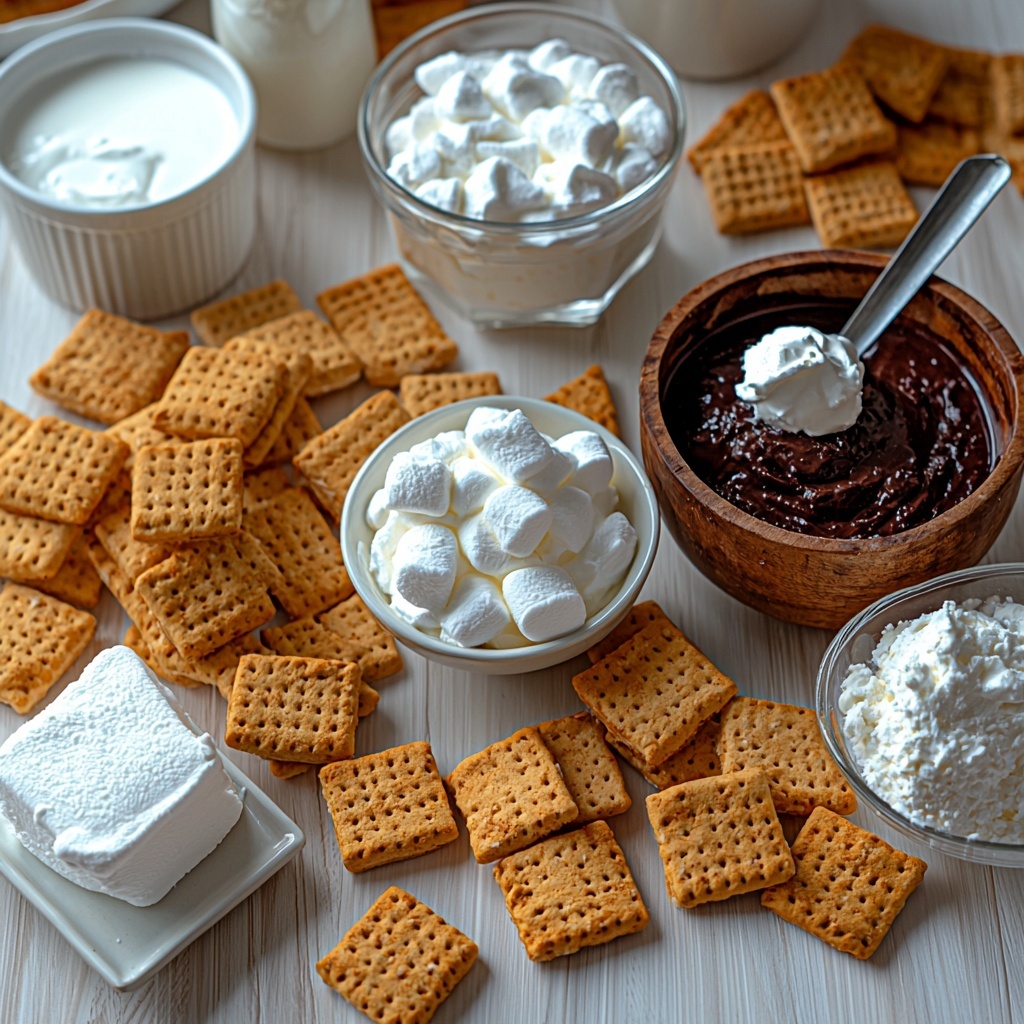
The beauty of this Frozen S’mores Sandwiches Recipe lies in its straightforward ingredients, each chosen to create that iconic s’mores experience with a cool, creamy finish. Every item plays a vital role, balancing texture, flavor, and that classic campfire vibe we all crave.
- Graham crackers (12, separated into squares): The crunchy foundation that provides the satisfying s’mores structure and subtle sweetness.
- Cream cheese (½ brick, about 4 ounces, room temperature): Adds a tangy richness and silky texture that blends beautifully with the marshmallow layer.
- Marshmallow crème/fluff (3.5 ounces): The signature fluffiness that mimics marshmallows roasted over a fire, delivering sweetness and lightness.
- Cool Whip (2 cups, thawed and divided): Brings a creamy, airy element to both layers, making the dessert feel like a dreamy frozen treat.
- Whole milk (2 cups, cold): Essential for perfectly mixing the chocolate pudding, contributing a smooth and creamy texture.
- Chocolate pudding mix (4 ounces or 113 grams): Creates the rich, velvety chocolate layer that completes the classic s’mores flavor profile.
How to Make Frozen S’mores Sandwiches Recipe
Step 1: Prepare Your Pan and Lay the Graham Crackers
Start by lining a 7×11-inch pan with parchment paper, making sure the sides are high to help lift the dessert out easily later. Then, evenly place the graham cracker squares along the bottom—this crunchy base is key to building those perfect frozen sandwiches.
Step 2: Mix the Cream Cheese and Marshmallow Layer
Using a hand mixer, beat the room temperature cream cheese until it’s silky smooth. Then add the marshmallow crème and blend again until fluffy. Folding in half of the Cool Whip softens this mixture into a light, sweet cloud that’ll be spread over the crackers to evoke that classic gooey s’mores feeling.
Step 3: Chill the First Layer
Spread the cream cheese mixture evenly over the graham crackers, then slide the pan into the fridge while you prepare the chocolate pudding layer. Chilling this base helps set the stage for the layers to stack up neatly.
Step 4: Prepare the Chocolate Pudding Layer
In a large bowl, whisk together cold whole milk and chocolate pudding mix with a hand mixer for about 2 minutes until thick and luscious. Stir in the remaining Cool Whip to create a rich, creamy texture that contrasts so beautifully with the marshmallow layer underneath.
Step 5: Assemble and Freeze
Spread the chocolate pudding layer evenly over the chilled cream cheese layer. Then add another layer of graham crackers on top, pressing lightly to create those neat sandwich layers. Cover tightly with plastic wrap or foil and pop it in the freezer for at least 4 hours, until fully set and ready to slice.
Step 6: Slice and Serve
Once frozen solid, remove the pan and let it sit for about 15 minutes to soften slightly—this makes slicing easier and cleaner. Use a sharp knife to cut into individual sandwiches, unveiling those beautiful layers that look just as good as they taste!
How to Serve Frozen S’mores Sandwiches Recipe
Garnishes
While these sandwiches are perfect on their own, a light sprinkle of crushed graham crackers or a drizzle of melted chocolate over the top can elevate the presentation. A few mini toasted marshmallows or a dust of cocoa powder add a whimsical final touch that’s sure to impress your family or guests.
Side Dishes
This Frozen S’mores Sandwiches Recipe shines as a dessert, but serving it alongside a fresh berry salad offers a lovely balance of tartness and freshness. Pairing with a glass of cold milk or a creamy coffee drink also makes the experience even more comforting and indulgent.
Creative Ways to Present
For parties or special occasions, serve these sandwiches on a rustic wooden board with edible flowers or mint leaves around for a pop of color. You can also stack smaller versions on sticks to create s’mores pops, turning this classic treat into a fun, handheld dessert.
Make Ahead and Storage
Storing Leftovers
Any leftover Frozen S’mores Sandwiches should be kept tightly wrapped in plastic or foil in the refrigerator. They stay at their best for about 3-4 days, maintaining that creamy texture and crunchy graham cracker layers without becoming soggy.
Freezing
If you want to save these treats for longer, wrap each sandwich individually with plastic wrap or foil and store them in an airtight container in the freezer. Properly stored, they can last up to 3 months, making them a fantastic make-ahead dessert option for anytime indulgence.
Reheating
Since this is a frozen dessert, you won’t need to reheat. Simply remove the sandwiches from the freezer and let them thaw for about 10-15 minutes at room temperature before enjoying, allowing the flavors to shine through with perfect creaminess.
FAQs
Can I use regular marshmallows instead of marshmallow crème?
While regular marshmallows could work, marshmallow crème provides a smoother texture that blends better with the cream cheese layer, giving you that iconic fluffy and spreadable consistency essential for the sandwich.
Is it okay to use instant pudding mix?
Yes! Instant pudding mix is perfect for this recipe because it thickens quickly and creates a creamy chocolate layer that complements the fluffy marshmallow perfectly.
Can I make these gluten-free?
Absolutely! Just swap out the graham crackers for your favorite gluten-free version, and you’ll have a delicious gluten-free Frozen S’mores Sandwiches Recipe that everyone can enjoy.
How long should the sandwiches sit before slicing?
Letting the sandwiches sit for about 15 minutes after removing them from the freezer is key. This slight thaw softens the layers enough so you can cut cleanly without crumbling the graham crackers.
What’s the best way to cut the sandwiches neatly?
Use a sharp knife and wipe it clean between each cut. You can also dip the knife in warm water and dry it before slicing to make cutting smoother and prevent sticking.
Final Thoughts
This Frozen S’mores Sandwiches Recipe is a true crowd-pleaser, blending the nostalgic flavors of s’mores with refreshing, creamy layers that cool you down on a hot day. It’s simple, satisfying, and foolproof, so why not give it a try? Whether for a family treat, a party dessert, or just a fun project, these sandwiches will quickly become one of your favorite go-to recipes for sweet, chilled delight.
Print
Frozen S’mores Sandwiches Recipe
- Prep Time: 15 minutes
- Cook Time: 0 minutes
- Total Time: 4 hours 15 minutes
- Yield: 12 servings
- Category: Dessert
- Method: No-Cook
- Cuisine: American
Description
Frozen S’mores is a no-bake, chilled dessert that combines layers of creamy marshmallow and chocolate pudding with crunchy graham crackers to create a cool, delicious treat perfect for warm days or parties. This recipe blends cream cheese, marshmallow fluff, Cool Whip, and chocolate pudding mix to layer over graham crackers, then freezes everything into easy-to-serve sandwiches.
Ingredients
Base Layer
- 12 graham crackers (separated into squares and divided)
- ½ brick cream cheese (room temperature, 4 ounces)
- 3.5 ounces marshmallow crème (fluff)
- 1 cup Cool Whip (thawed in the fridge)
Chocolate Pudding Layer
- 2 cups whole milk (cold)
- 4 ounces chocolate pudding mix (113 grams)
- 1 cup Cool Whip (thawed in the fridge)
Additional
- Remaining graham cracker squares for topping
Instructions
- Prepare Pan: Line a 7×11-inch pan with parchment paper, ensuring the sides are high for easy removal of the frozen dessert later.
- Layer Graham Crackers: Evenly lay the graham cracker squares on the bottom of the pan and set aside.
- Make Cream Cheese Layer: In a large bowl, beat the room temperature cream cheese until smooth using a hand mixer. Add in the marshmallow crème and beat again until well combined.
- Fold and Spread Cool Whip: Gently fold one cup of Cool Whip into the cream cheese mixture and spread this evenly over the graham cracker layer in the pan.
- Chill First Layer: Place the pan in the refrigerator to chill while preparing the next layer.
- Prepare Chocolate Pudding: In another large bowl, combine the cold whole milk and chocolate pudding mix. Use a hand mixer to blend for about two minutes until thickened. Then fold in the remaining cup of Cool Whip and mix until fully combined.
- Assemble Second Layer: Spread the chocolate pudding mixture evenly over the chilled cream cheese layer, then top with the remaining graham cracker squares.
- Freeze: Cover the pan tightly with plastic wrap or foil and place it in the freezer. Freeze for at least four hours or until completely set.
- Serve: Remove from freezer and let sit at room temperature for about 15 minutes to soften slightly. Use a sharp knife to cut into individual frozen s’mores sandwiches.
- Storage: To keep, wrap each sandwich tightly and store individually in the freezer.
Notes
- Ensure the cream cheese is at room temperature for easier blending and smoother texture.
- Allow the frozen s’mores to sit for 15 minutes after removal from the freezer to soften slightly for easier cutting.
- Use parchment paper with high sides in the pan for easy removal of the entire dessert block.
- Wrap individual sandwiches tightly to prevent freezer burn and maintain freshness.
- This recipe is best enjoyed chilled straight from the freezer during warm weather.


